[x_section style=”margin: 0px 0px 0px 0px; padding: 05px 0px 0px 0px; “][x_row inner_container=”true” marginless_columns=”false” bg_color=”” style=”margin: 0px auto 0px auto; padding: 0px 0px 0px 0px; “][x_column bg_color=”” type=”1/1″ style=”padding: 0px 0px 0px 0px; “][x_text class=”left-text “]
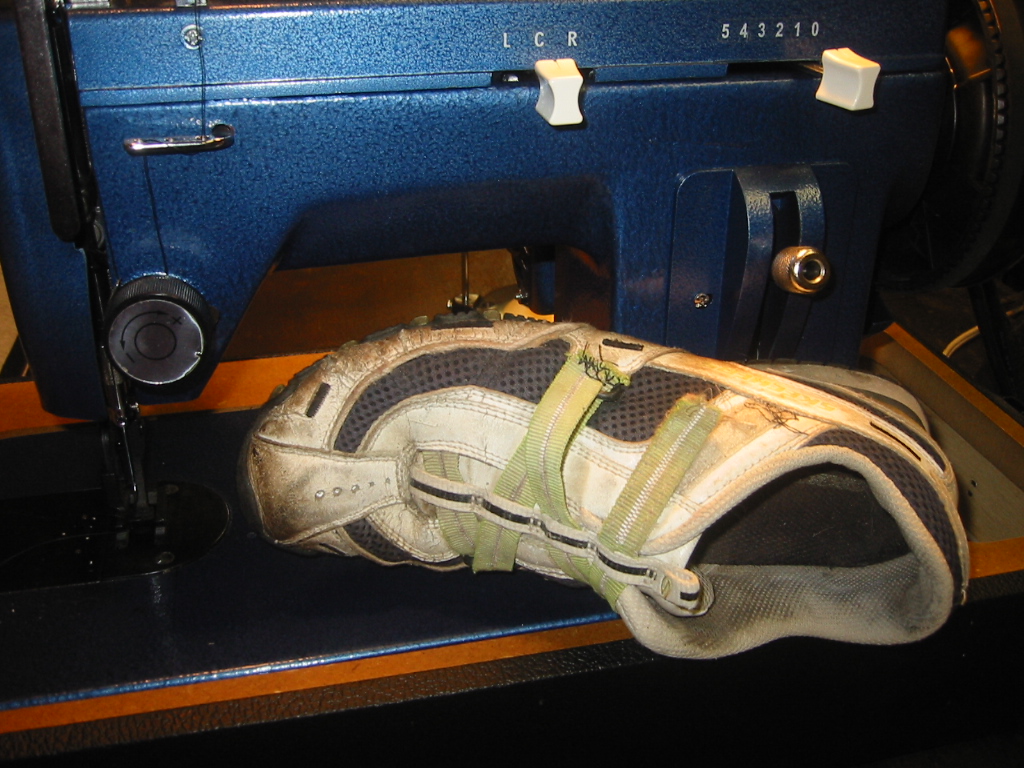
Repairing a shoe
One of our goals is to be self-sufficient cruisers. To that end, I’m now the official canvas worker, an old name for someone who sews sails and boat related projects like sail covers, ditty bags, or even seat cushions. We’ve chosen junk sails for our boat. Junk sails are connected flat panels so a DIYer can easily make these sails unlike the more complicated Bermuda rig sails. You just need sail cloth, a hot knife, thread and a good machine.
We had several parameters for our machine:
1. It had to fit on a boat. So a great big, long-necked commercial machine wouldn’t work.
2. It had to be economical. Used commercial machines may cost $2000 or more.
3. Had to be powerful enough to sew through multiple layers of heavy materials such as canvas like Sunbrella or slick materials such as Dacron. A regular home machine isn’t strong enough.
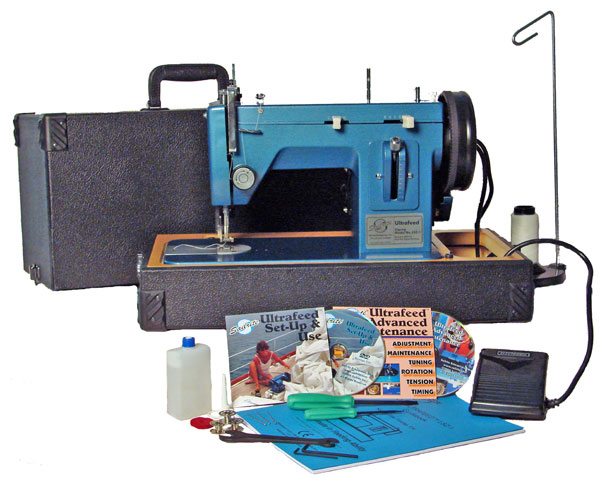
After looking around and sufficiently agonizing over the decision we settled on a Sailrite machine.[/x_text][x_custom_headline level=”h3″ looks_like=”h4″ accent=”false”]Sailrite Ultrafeed LSZ[/x_custom_headline][/x_column][/x_row][/x_section][x_section style=”margin: 0px 0px 0px 0px; padding: 0px 0px 0px 0px; “][x_row inner_container=”true” marginless_columns=”false” bg_color=”” style=”margin: 0px auto 0px auto; padding: 0px 0px 0px 0px; “][x_column bg_color=”” type=”1/1″ style=”padding: 0px 0px 0px 0px; “][x_text]
The walking presser foot can sew heavy, bulky fabrics like
Naugahyde vinyl, canvas and hard, dried leather.
The Sailrite Ultrafeed LSZcan sew up to 8 layers of canvas.
Our final choice was the Sailrite Ultrafeed LSZ made by Sailrite, www.sailrite.com. We chose this machine for several reasons:
* Cost: $850 for the zigzag model
* All metal construction
* Small yet sturdy
* Mechanical walking presser foot allows you to sew heavy fabrics
* Custom box for the machine, which makes it great for stowing and moving.
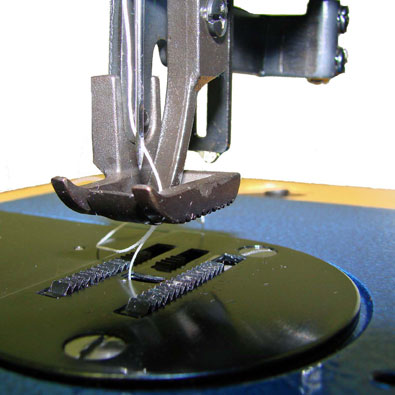
The Sailrite Ultrafeed LSZ can sew up to 8 layers of canvas.
The walking presser foot sold us on Sailrite’s Ultrafeed LSZ. The foot moves forward and back in time with the feed dog. This ensures that the layers that the layers of fabric are consistently moving together through machine resulting in consistently symmetrical stitch lengths.
Sailrite has a great web site and catalog. Also, two CDs come with the machine, and for someone like me who is mechanically challenged, they are invaluable.[/x_text][/x_column][/x_row][/x_section][x_section style=”margin: 0px 0px 0px 0px; padding: 45px 0px 45px 0px; “][x_row inner_container=”true” marginless_columns=”false” bg_color=”” style=”margin: 0px auto 0px auto; padding: 0px 0px 0px 0px; “][x_column bg_color=”” type=”1/4″ style=”padding: 0px 0px 0px 0px; “][x_image type=”none” src=”http://svseeker.com/images/canvas_work/toolbox.JPG” alt=”” link=”false” href=”#” title=”” target=”” info=”none” info_place=”top” info_trigger=”hover” info_content=””][/x_column][x_column bg_color=”” type=”1/4″ style=”padding: 0px 0px 0px 0px; “][x_image type=”none” src=”http://svseeker.com/images/canvas_work/before.JPG” alt=”” link=”false” href=”#” title=”” target=”” info=”none” info_place=”top” info_trigger=”hover” info_content=””][/x_column][x_column bg_color=”” type=”1/2″ style=”padding: 0px 0px 0px 0px; “][x_custom_headline level=”h3″ looks_like=”h4″ accent=”true”]Getting Organized[/x_custom_headline][x_text]
When I first started out sewing in the shop, parts of my projects were scattered across the CNC table, the wooden table, and the floor. My tools and accessories were thrown into a tote that just happened to be laying on a nearby table. Not much thought put into organizing things. [/x_text][/x_column][/x_row][x_row inner_container=”true” marginless_columns=”false” bg_color=”” style=”margin: 0px auto 0px auto; padding: 0px 0px 0px 0px; “][x_column bg_color=”” type=”1/4″ style=”padding: 0px 0px 0px 0px; “][x_image type=”none” src=”http://svseeker.com/images/canvas_work/after.JPG” alt=”” link=”false” href=”#” title=”” target=”” info=”none” info_place=”top” info_trigger=”hover” info_content=””][/x_column][x_column bg_color=”” type=”1/4″ style=”padding: 0px 0px 0px 0px; “][x_image type=”none” src=”http://svseeker.com/images/canvas_work/crystal_light_thread.JPG” alt=”” link=”false” href=”#” title=”” target=”” info=”none” info_place=”top” info_trigger=”hover” info_content=””][/x_column][x_column bg_color=”” type=”1/2″ style=”padding: 0px 0px 0px 0px; “][x_text]Then after a discussion we hit upon using one of our old toolboxes – turning it into a sewing box. Now my assortment of needles, bobbins, tools and threads can be easily found.
By the way, Crystal Light containers make great spool holders.[/x_text][/x_column][/x_row][/x_section][x_section style=”margin: 0px 0px 0px 0px; padding: 0px 0px 0px 0px; “][x_row inner_container=”true” marginless_columns=”false” bg_color=”” style=”margin: 0px auto 0px auto; padding: 0px 0px 0px 0px; “][x_column bg_color=”” type=”1/1″ style=”padding: 0px 0px 0px 0px; “][x_custom_headline level=”h2″ looks_like=”h3″ accent=”true”]Machine and Cable Covers[/x_custom_headline][/x_column][/x_row][/x_section][x_section style=”margin: 0px 0px 0px 0px; padding: 45px 0px 45px 0px; “][x_row inner_container=”true” marginless_columns=”false” bg_color=”” style=”margin: 0px auto 0px auto; padding: 0px 0px 0px 0px; “][x_column bg_color=”” type=”1/3″ style=”padding: 0px 0px 0px 0px; “][x_image type=”none” src=”http://svseeker.com/images/canvas_work/school_bus.jpg” alt=”” link=”false” href=”#” title=”” target=”” info=”none” info_place=”top” info_trigger=”hover” info_content=””][x_text]While looking for a cheap source of windows for our sailboat, we came across a great deal – a school bus with 14 working, unbroken windows that still ran for only $500. We bought it, drove it home and then spent 5 weeks salvaging anything that might be of use, including the fabric covering the seats. [/x_text][/x_column][x_column bg_color=”” type=”1/3″ style=”padding: 0px 0px 0px 0px; “][x_image type=”none” src=”http://svseeker.com/images/canvas_work/seat_cover.JPG” alt=”” link=”false” href=”#” title=”” target=”” info=”none” info_place=”top” info_trigger=”hover” info_content=””][x_text]Some of the seats had as many as 3 covers on them and it’s a nearly indestructible vinyl.[/x_text][/x_column][x_column bg_color=”” type=”1/3″ style=”padding: 0px 0px 0px 0px; “][x_image type=”none” src=”http://svseeker.com/images/canvas_work/sewing_kay1.JPG” alt=”” link=”false” href=”#” title=”” target=”” info=”none” info_place=”top” info_trigger=”hover” info_content=””][x_text]With 28 seat back and bottoms of school bus vinyl I sewed up a variety of covers – one for the plasma cutter and its cable, the Hobart welder, and the Cobramatic’s cables. The covers will protect the machines if we choose to leave them outside and the cable covers will prolong the life of the cables by guarding against gouges or wearing.[/x_text][/x_column][/x_row][x_row inner_container=”true” marginless_columns=”false” bg_color=”” style=”margin: 0px auto 0px auto; padding: 0px 0px 0px 0px; “][x_column bg_color=”” type=”1/3″ style=”padding: 0px 0px 0px 0px; “][x_image type=”none” src=”http://svseeker.com/images/canvas_work/plasma_torch_cover.JPG” alt=”” link=”false” href=”#” title=”” target=”” info=”none” info_place=”top” info_trigger=”hover” info_content=””][x_text]While cutting up the school bus with the plasma cutter, I had problems with blow back especially when cutting into parts of its engine or where there were flammable materials or liquids. To protect the plasma gun I sewed a cover for it that has a flap over the trigger that protected the user’s hand.[/x_text][/x_column][x_column bg_color=”” type=”1/3″ style=”padding: 0px 0px 0px 0px; “][x_image type=”none” src=”http://svseeker.com/images/canvas_work/cable_cover_gun.JPG” alt=”” link=”false” href=”#” title=”” target=”” info=”none” info_place=”top” info_trigger=”hover” info_content=””][x_text]I used Velcro taken off the seats as well to make a removable cover for the Cobramatic’s cables. This lets us take the cover off easily and quickly and makes for a snug fitting cover.
[/x_text][/x_column][x_column bg_color=”” type=”1/3″ style=”padding: 0px 0px 0px 0px; “][x_image type=”none” src=”http://svseeker.com/images/metal_working/welder_cover.JPG” alt=”” link=”false” href=”#” title=”” target=”” info=”none” info_place=”top” info_trigger=”hover” info_content=””][x_text]Our new wire-feeder, a
water cooled, push-pull Python
gun, had about 30 feet of cables
that needed to be covered.[/x_text][/x_column][/x_row][/x_section][x_section style=”margin: 0px 0px 0px 0px; padding: 0px 0px 0px 0px; “][x_row inner_container=”true” marginless_columns=”false” bg_color=”” style=”margin: 0px auto 0px auto; padding: 0px 0px 0px 0px; “][x_column bg_color=”” type=”1/1″ style=”padding: 0px 0px 0px 0px; “][x_custom_headline level=”h3″ looks_like=”h4″ accent=”true”]A Stick Tight Foot Switch[/x_custom_headline][x_text]The foot switch is light and easily moved about. I came up with the idea of adding magnets to its base.[/x_text][/x_column][/x_row][/x_section][x_section style=”margin: 0px 0px 0px 0px; padding: 0px 0px 0px 0px; “][x_row inner_container=”true” marginless_columns=”false” bg_color=”” style=”margin: 0px auto 0px auto; padding: 0px 0px 0px 0px; “][x_column bg_color=”” type=”1/3″ style=”padding: 0px 0px 0px 0px; “][x_image type=”none” src=”http://svseeker.com/images/canvas_work/magnet.JPG” alt=”” link=”false” href=”#” title=”” target=”” info=”none” info_place=”top” info_trigger=”hover” info_content=””][x_text]I had removed neodymium magnets from used computer hard drives. The magnets were still attached to tabs so he separated the two.[/x_text][/x_column][x_column bg_color=”” type=”1/3″ style=”padding: 0px 0px 0px 0px; “][x_image type=”none” src=”http://svseeker.com/images/canvas_work/foot_pedal.JPG” alt=”” link=”false” href=”#” title=”” target=”” info=”none” info_place=”top” info_trigger=”hover” info_content=””][x_text]I placed the magnets in the bottom plate of the foot switch and potted, or filled, it with epoxy to fix the magnets in place.[/x_text][/x_column][x_column bg_color=”” type=”1/3″ style=”padding: 0px 0px 0px 0px; “][x_image type=”none” src=”http://svseeker.com/images/canvas_work/foot_pedal_2.JPG” alt=”” link=”false” href=”#” title=”” target=”” info=”none” info_place=”top” info_trigger=”hover” info_content=””][x_text] Jar lids make a handy tray to mix epoxy.[/x_text][/x_column][/x_row][x_row inner_container=”true” marginless_columns=”false” bg_color=”” style=”margin: 0px auto 0px auto; padding: 0px 0px 0px 0px; “][x_column bg_color=”” type=”1/3″ style=”padding: 0px 0px 0px 0px; “][x_image type=”none” src=”http://svseeker.com/images/canvas_work/plastic_insulator_presser_foot.JPG” alt=”” link=”false” href=”#” title=”” target=”” info=”none” info_place=”top” info_trigger=”hover” info_content=””][x_text]After the epoxy dried, I created an insulator for the electronics board in the foot to prevent the contacts on the bottom side of the board from shorting against the magnets.[/x_text][/x_column][x_column bg_color=”” type=”1/3″ style=”padding: 0px 0px 0px 0px; “][x_image type=”none” src=”http://svseeker.com/images/canvas_work/presser_foot_magnets.JPG” alt=”” link=”false” href=”#” title=”” target=”” info=”none” info_place=”top” info_trigger=”hover” info_content=””][x_text]A plastic jug donated the needed plastic. Another fine example of how we recycle pretty much anything at hand.
[/x_text][/x_column][x_column bg_color=”” type=”1/3″ style=”padding: 0px 0px 0px 0px; “][x_image type=”none” src=”http://svseeker.com/images/canvas_work/foot_switch_completed.JPG” alt=”” link=”false” href=”#” title=”” target=”” info=”none” info_place=”top” info_trigger=”hover” info_content=””][x_text]My foot switch now sticks to the steel table’s shelf or legs so I can use my knee.[/x_text][/x_column][/x_row][/x_section][x_section style=”margin: 0px 0px 0px 0px; padding: 0px 0px 0px 0px; “][x_row inner_container=”true” marginless_columns=”false” bg_color=”” style=”margin: 0px auto 0px auto; padding: 0px 0px 0px 0px; “][x_column bg_color=”” type=”1/1″ style=”padding: 0px 0px 0px 0px; “][x_custom_headline level=”h2″ looks_like=”h3″ accent=”true”]What else can we make?[/x_custom_headline][x_text]We grew tired of the slack chains hanging from the gantry cranes hitting us in the head and snagging on every corner, so Kay make us some chain bags for about $3 that normally sell for about $80. She converted a slings she originally make from trucker tie down strap which was too worn to continue life lifting loads. Add to that some salvaged school bus seat vinyl, so blossoming skill and we now have to very heavy duty chain bags. [/x_text][/x_column][/x_row][/x_section][x_section style=”margin: 0px 0px 0px 0px; padding: 0px 0px 0px 0px; “][x_row inner_container=”true” marginless_columns=”false” bg_color=”” style=”margin: 0px auto 0px auto; padding: 0px 0px 0px 0px; “][x_column bg_color=”” type=”1/1″ style=”padding: 0px 0px 0px 0px; “][x_video_embed no_container=”false” type=”16:9″][/x_video_embed][/x_column][/x_row][/x_section]