|
|
|||||||||||||||||||||||||||||||||||||||||||||||||||
Working with Lead
I am a long way from needing my ballast, but if you are building a submarine or a sailboat, working with the lead is a great way to fill time while you wait for the cash flow to buy the hull materials. PrecautionsThe list of what NOT to do is probably the most important thing to review when working with lead. Both lead dust and the vapors from melted lead are poisonous, especially to children and pregnant women. Lead poisoning in children will cause brain developmental problems and in adults it will destroy the kidneys. There is no treatment, and no way to remove the lead once your body is contaminated. Serious burns are more immediate as lead melts at about 630 degrees F and at that temperature it will easily burn through clothing and skin. Also moisture and hot lead do not mix. Water instantaneously expands to 30 times its liquid volume when vaporized by molten lead and will cause an explosion. So here are some precautions you may want to follow:
Sources for Lead
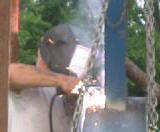
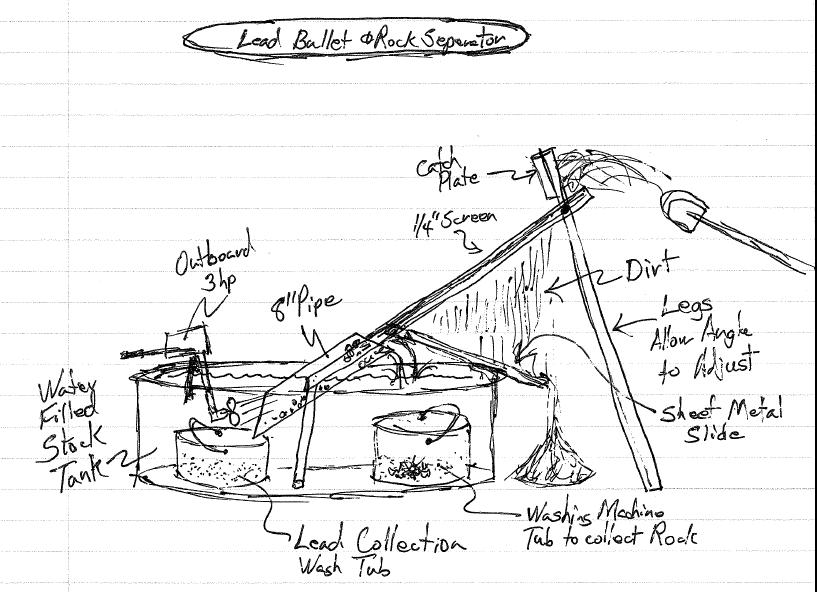
I there are 3 traditional sources for lead: scrap yards, and tire stores that might sell you their used tire balancing weights, gun ranges. Car batteries do not make the list because processing the acid is beyond the ability of a backyard operation to do safely. The commercial battery recyclers have equipment to reclaim the acid and plastic in batteries so there is more value in the battery that just the lead. BulletsIn 2003 we picked up 1700 pounds from a gun range, but not any gun range will do. The one I collect from is in the Hobbs Wildlife Management Area in Arkansas. I happen to stumble onto it while traveling a back road returning from a diving trip, and these are some of the nicest people you'll ever meet. This range actually has an automated system that collects the scrap into a bucket after the bullets hit the steel deflector wall. I only paid 8 cents a pound for the scrap which is 3 cents more that what they were getting from the scrap yard. The problem is that a about half of the weight is trash material consisting of the copper and brass jackets that surround the lead bullets and some bullets are solid copper. Add to that a good share of dirt and rocks that get blown and washed into the trap.
Wheel WeightsWhen we started collecting lead for the sailboat in late 2007, we hit every tire store in town. All of the small and lower end stores re-use lead weights but they might have a couple of buckets of damaged weights to sell. It's actually illegal from the stores to reuse the weights because they are more likely to fall off in the road way where they will be ground to dust by the traffic. That will cause some of them to come up with a lie. If your not sure what they are putting on your car, see if your weights have a fresh coat of silver paint and see if they mount the weight on the inside of the rim where it is harder for you to see it. The big national wide outlets like WalMart, Sams, Hibdon Tire, and Firestone will have their own collection programs. The local chain stores and better quality tire stores are your best bet because they will not put used weights on their customers cars. However they will often have contract deals with their wheel weight or battery suppliers that preclude them from selling their used weights. Don't forget the tractor trailer service centers. Semi truck wheel weights are huge compared to car weights. Out of almost 100 stores in the Tulsa area we got one chain of 9 stores and 2 or 3 others that we picked up from once a month. There are a dozen more that we stop at every 2 to 3 months. In less than a year we collected about 10,100 pounds of wheel weights that yielded about 9000 pounds of lead. There is about 20% loss of weight in wheel weights due to the steel clips and trash in the buckets. We also lost about 8 stores from the route in that time because they switched to a contract with their supplier. More and more wheel weights are also no longer made from lead. We pay 2 cents more than the local scrap yards and our price in less than a year has gone from 10 cents to 17 cents a pound in 2008. Scrap YardsThe scrap yard will be happy to sell you lead at the going rate. Most
yards have "clean lead" which is pipe, sheet and other scrap that
should not have any other metals attached. It will often come
with dirt and grease and water but 95% of it is lead. They will
often also have un-clean lead in the form of wheel weights. You can buy lead wheel weights
from the scrap yard for about 25% less than clean lead.
After you remove about 20% of that weight that accounts for the
steel clips and occasional lug nut you end up with a 5% savings.
If you are going to have to melt it down into ingots anyway, then
the additional 5% savings may be worth the pain of dealing with the
steel clips. The Lead MarketIf the Chinese and Indians keep buying cars that need batteries
and are just now starting to recycle them. The US is making more
bullets for Afghanistan and Iraq than we have since Vietnam.
Lead mainly comes from mines that are primarily about producing zinc
and so the demand for zinc is a contributor to the availability of
lead. Lead smelters bow up, miners go on strike. New
battery technologies will not use lead. So there is a mix of
things that control the price. Locally that price in 2006 was
32 cents, in 2007 it was 53 cents a pound and in 2008 it is
now $1 a pound. Even during the recession of 2008 the price of lead
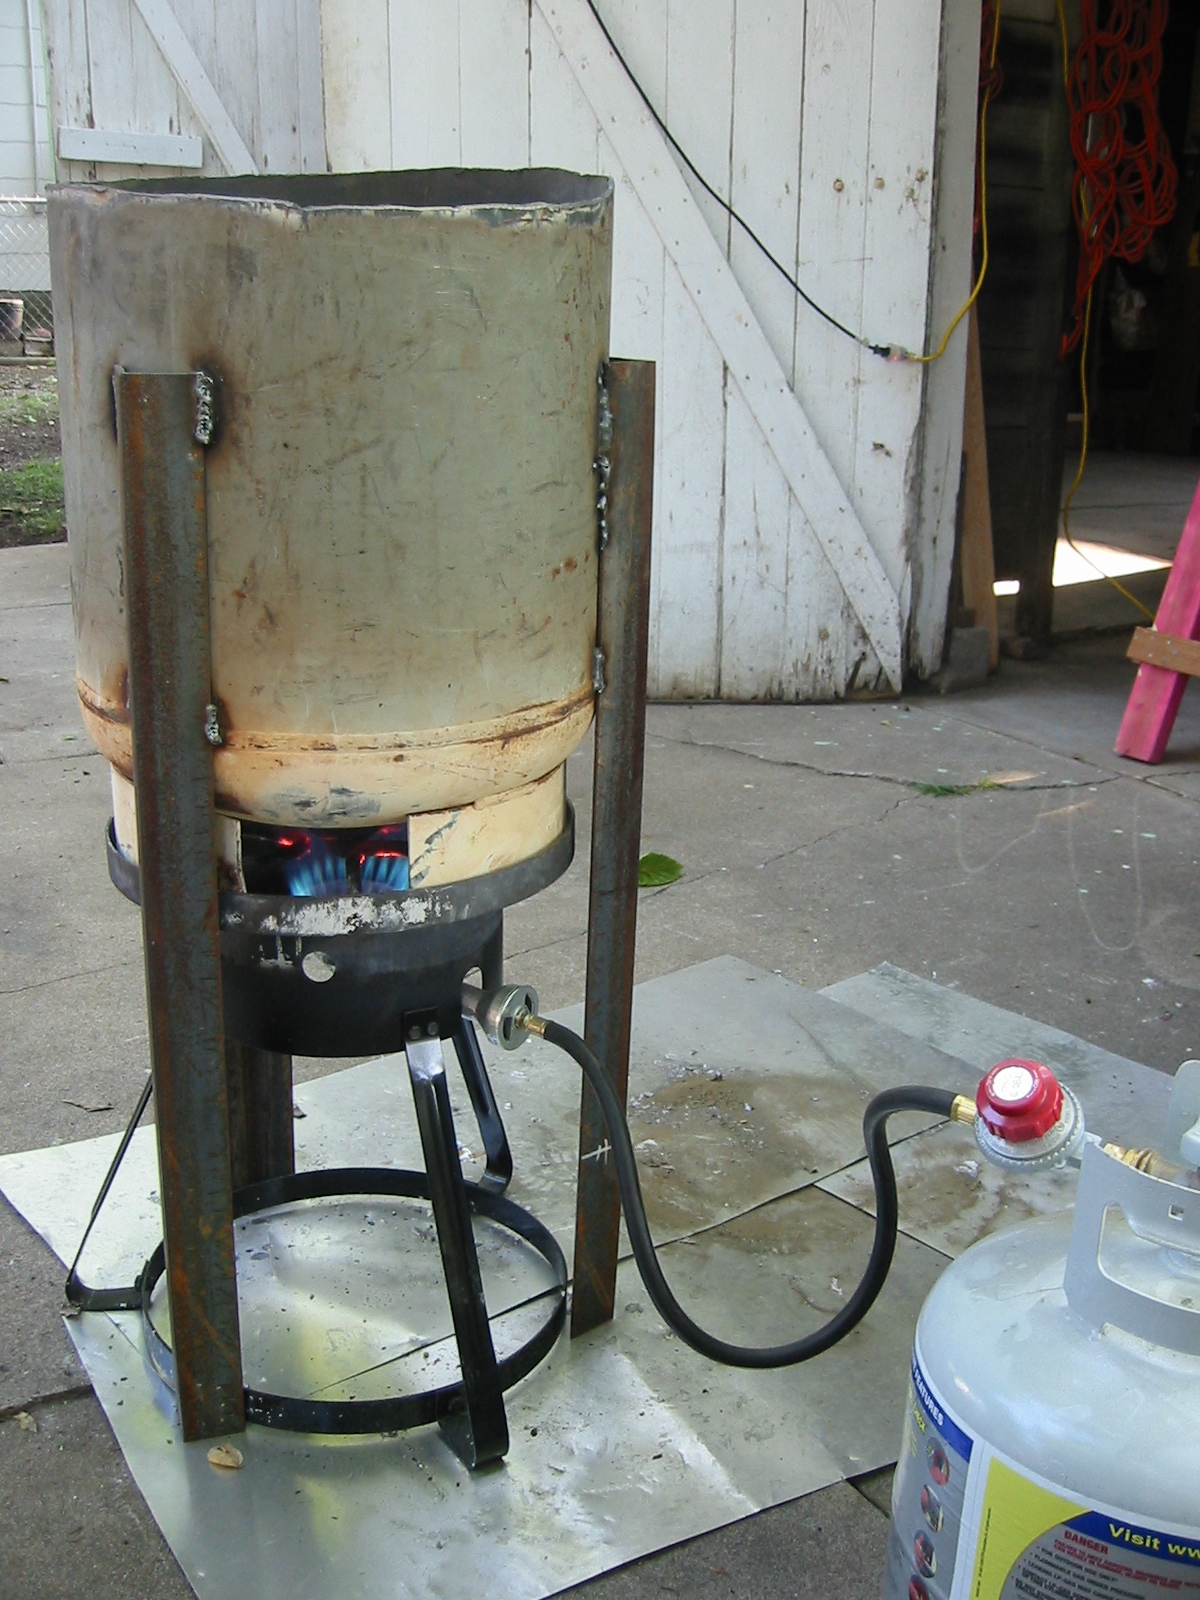
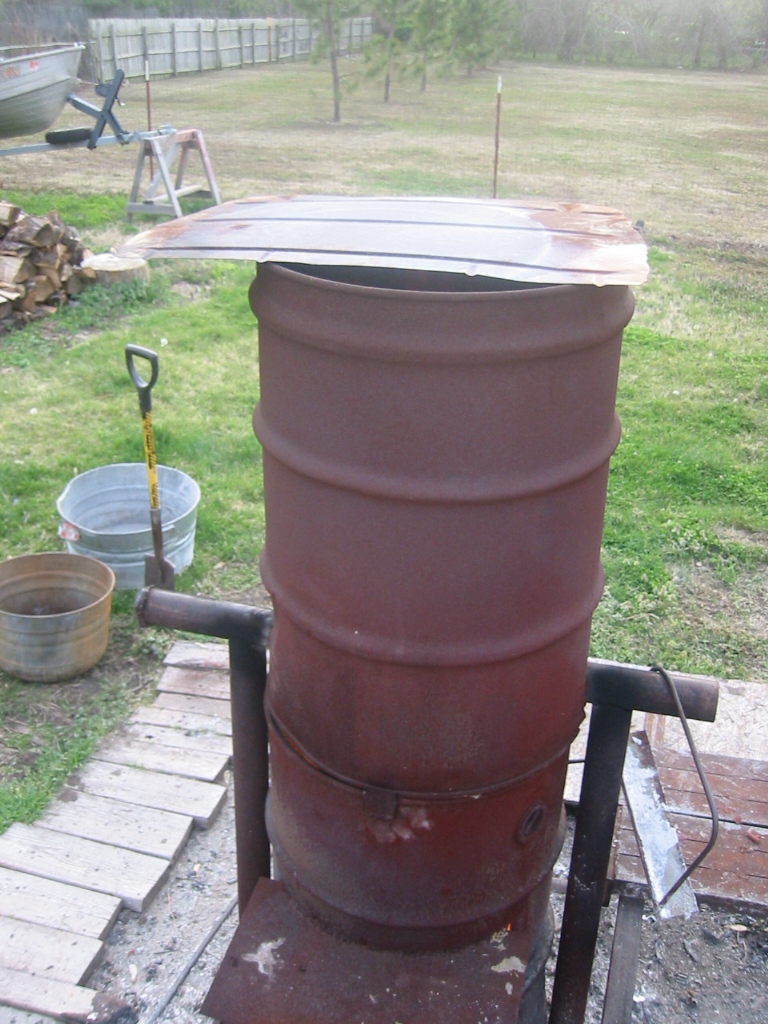
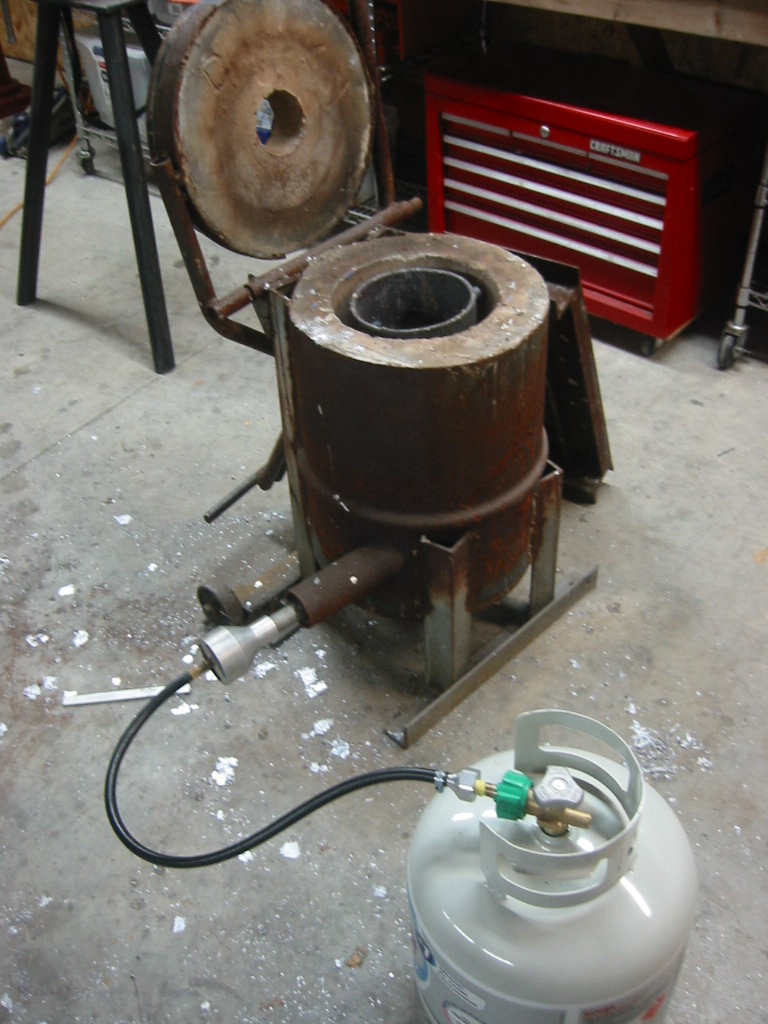
only dropped to 80 cents a pound. Propane Fired Lead SmelterI found a damaged turkey fryer and a couple of 5 gallon propane tanks for $50. This is not a bad way to go if you are processing less than 1000 pounds. If you are going to process thousands of pound then I'd suggest you look a my Wood Fired Smelter on below. You must have a steel or cast iron melting pot. Since aluminum melts at at 1220F I figured I could melt my lead in the bent pot that came with the fryer. But when I tried a small test batch, the bottom nearly fell out of the pot once the lead started to melt.
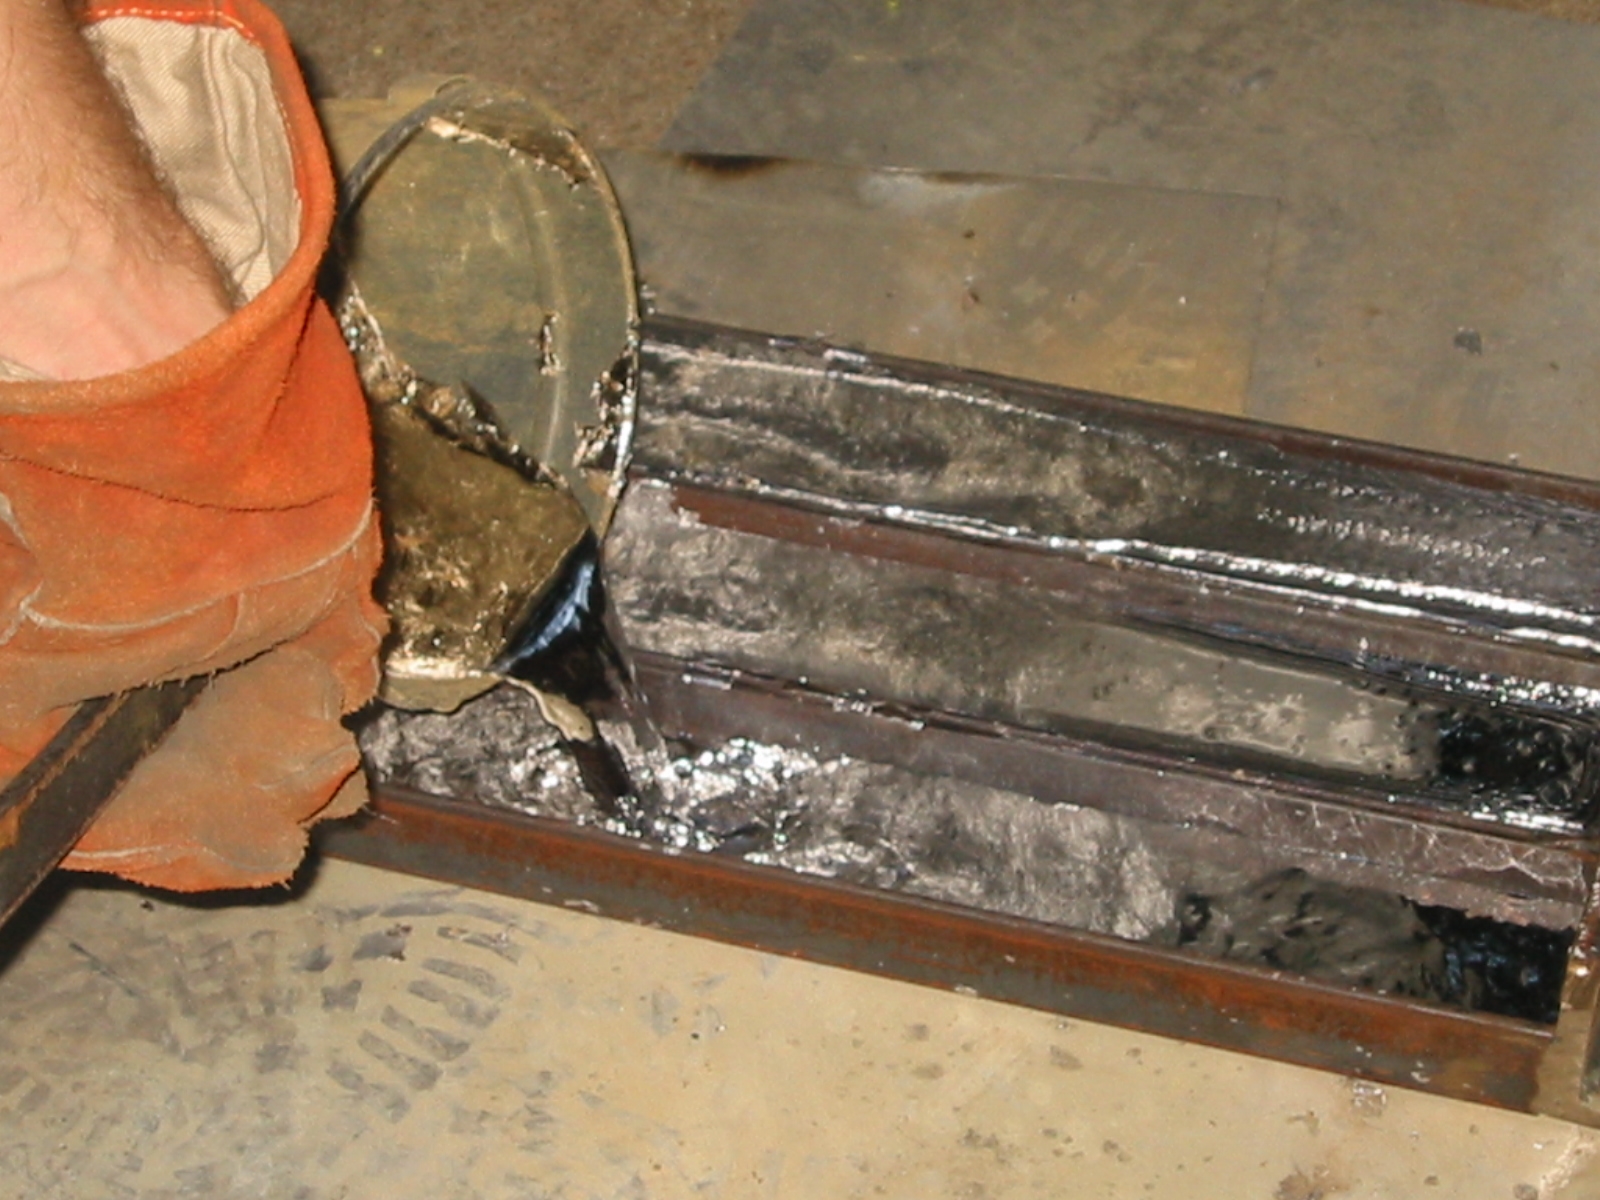
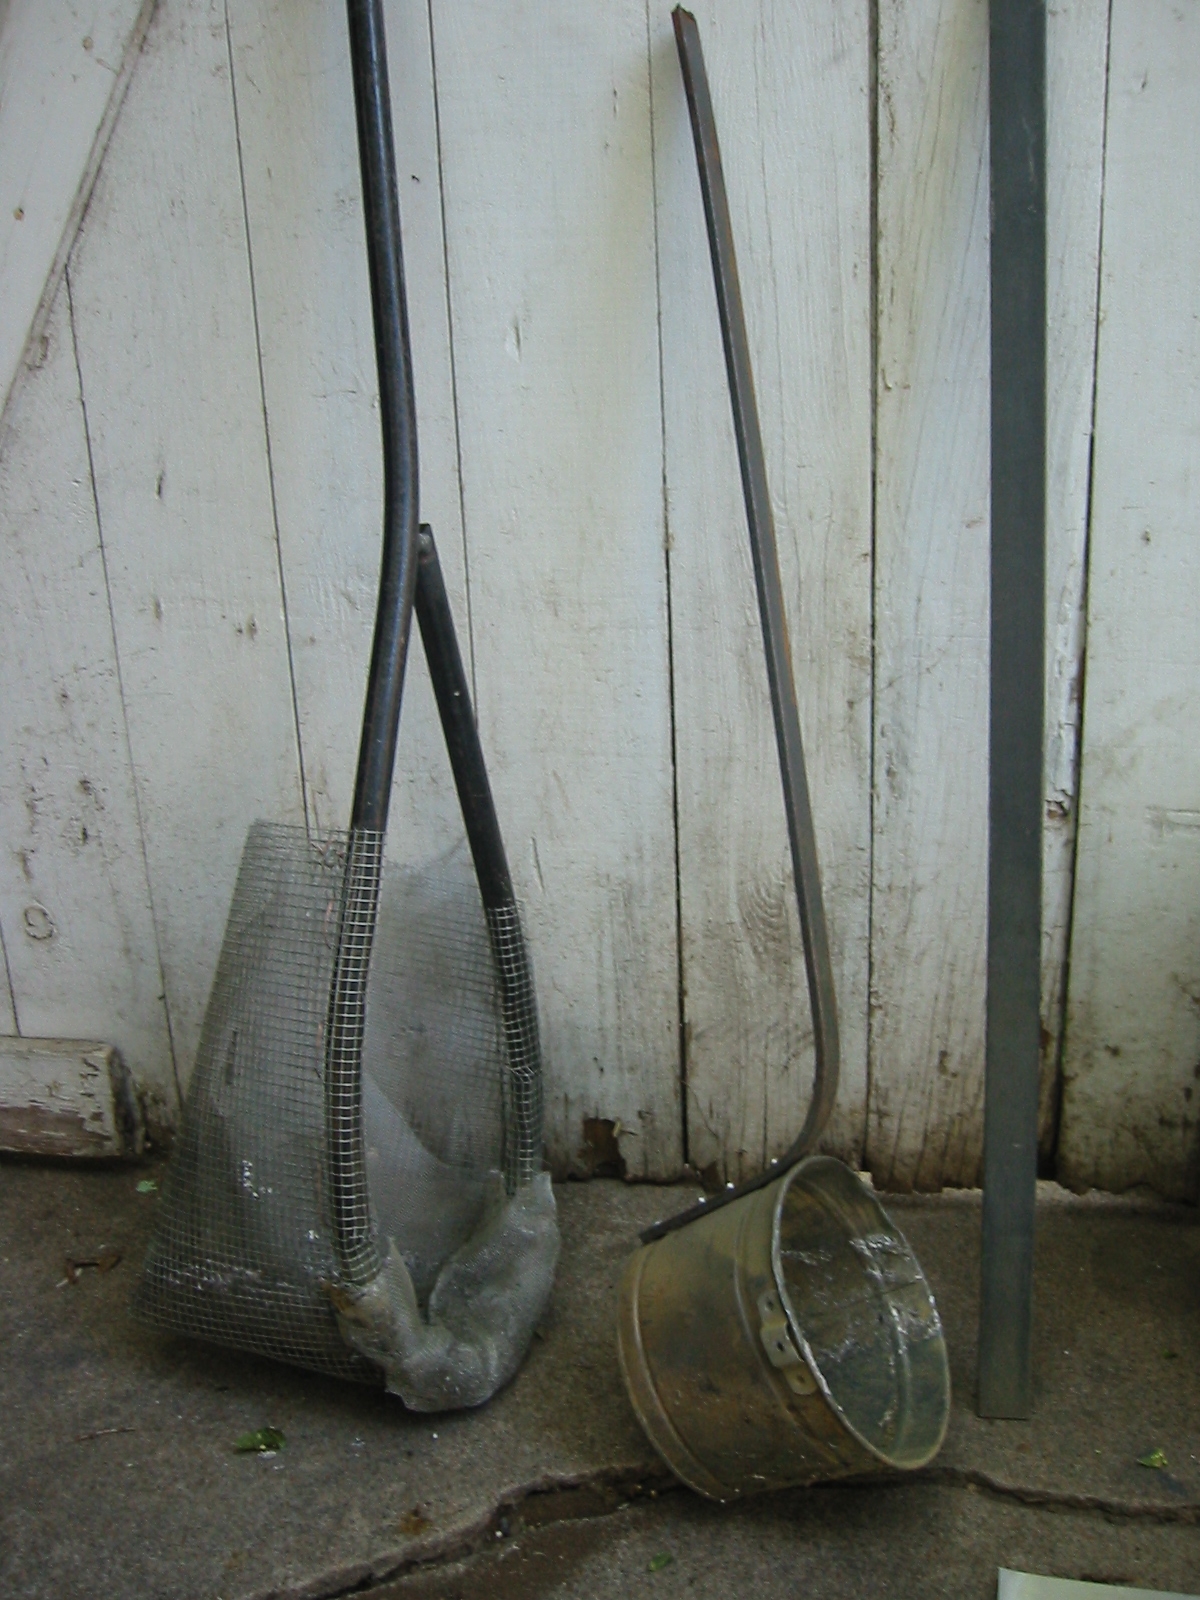
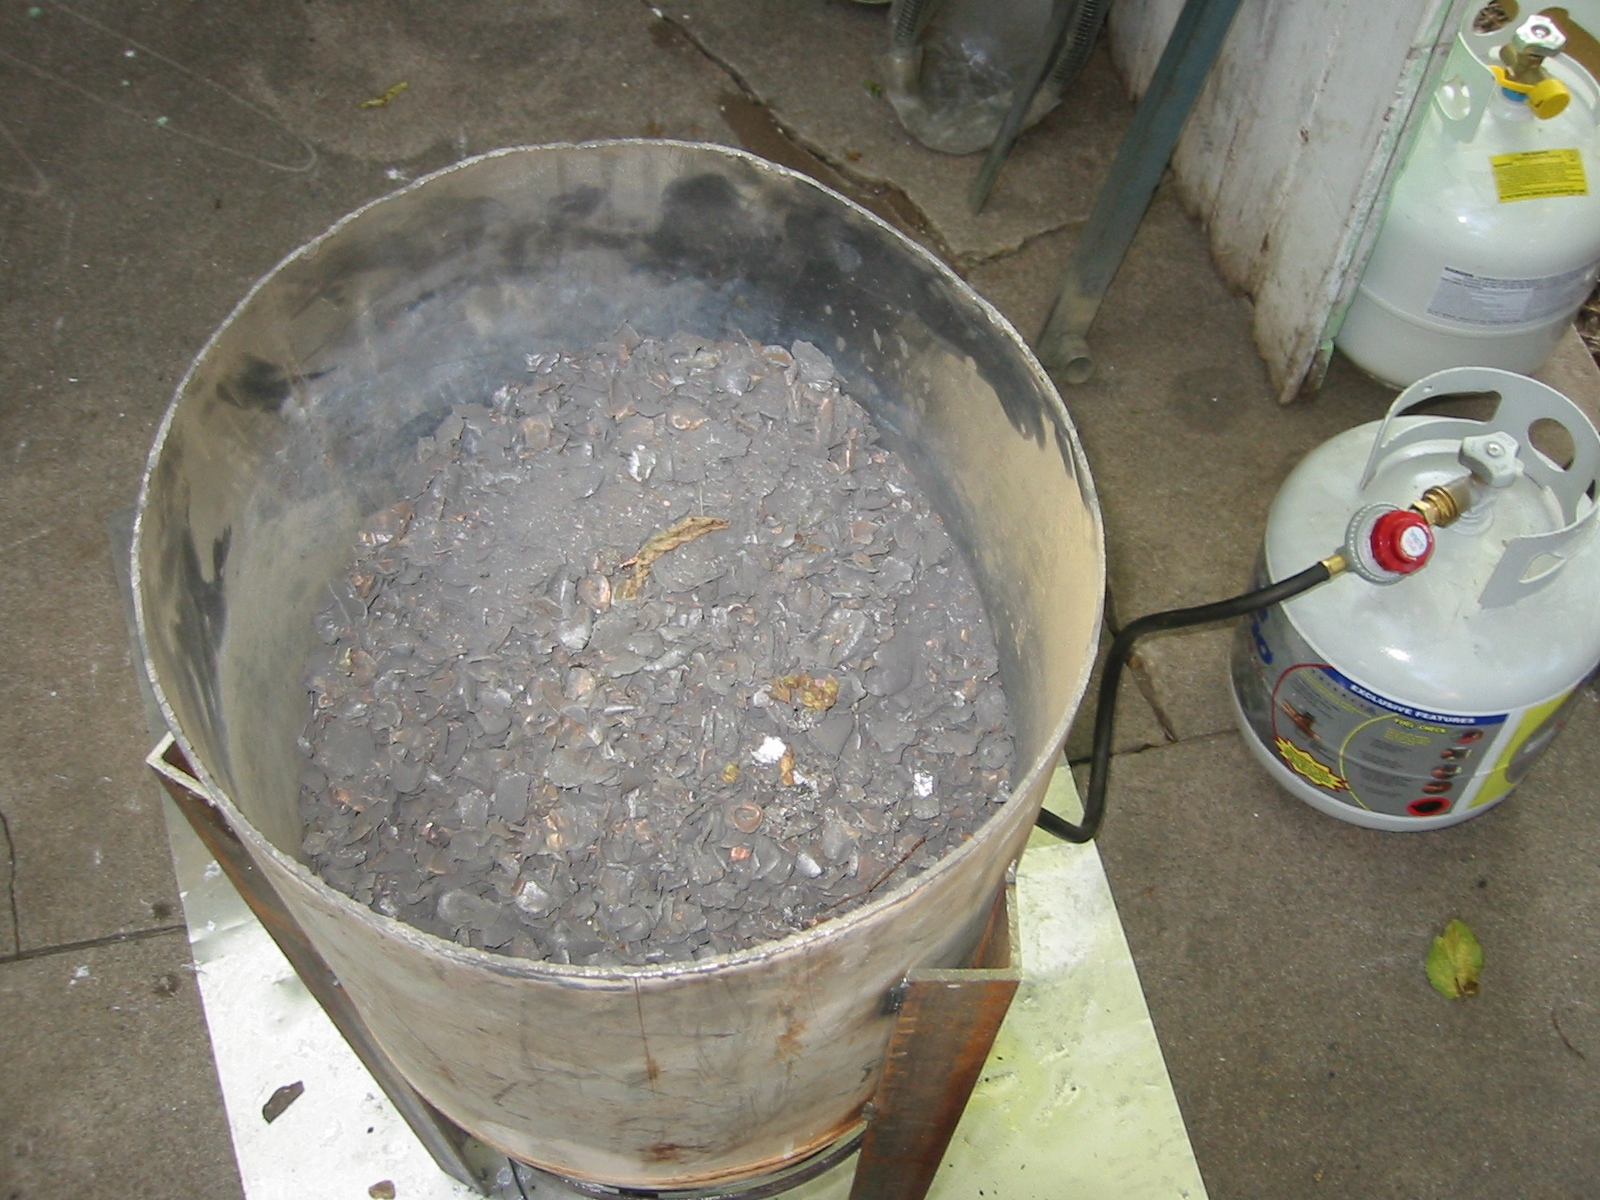
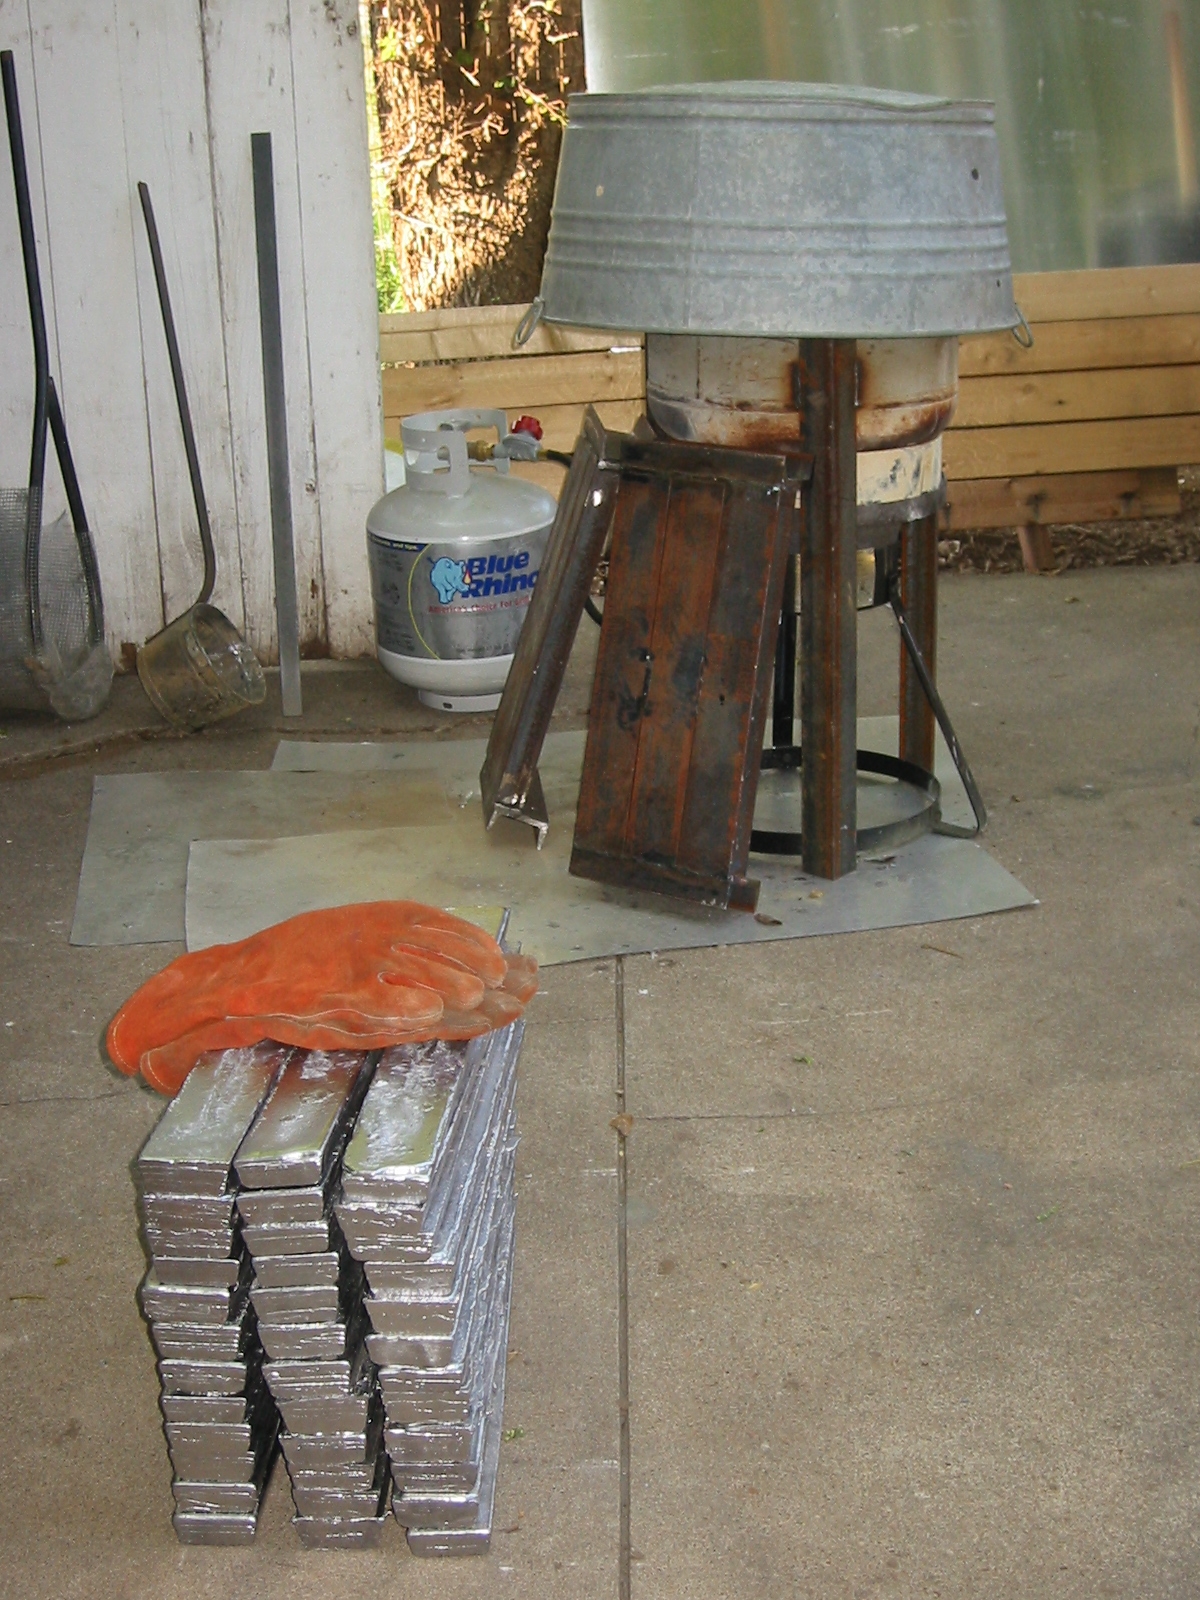
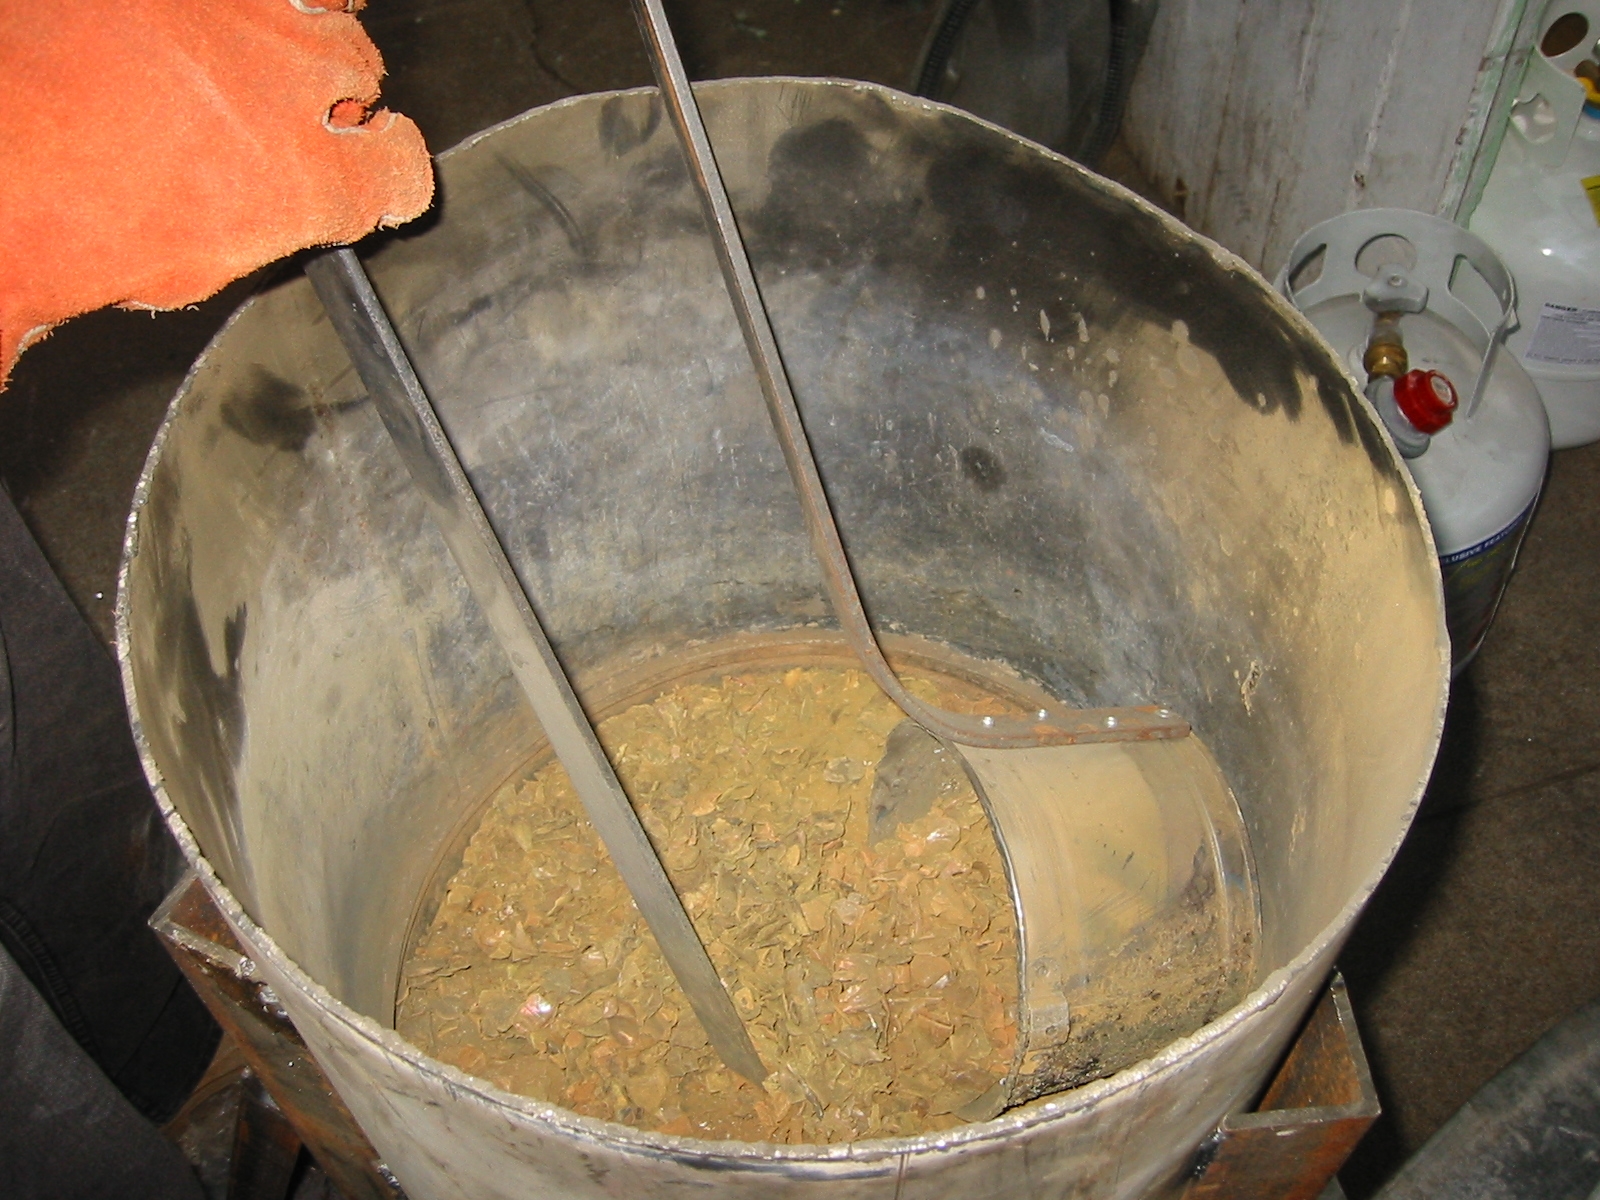
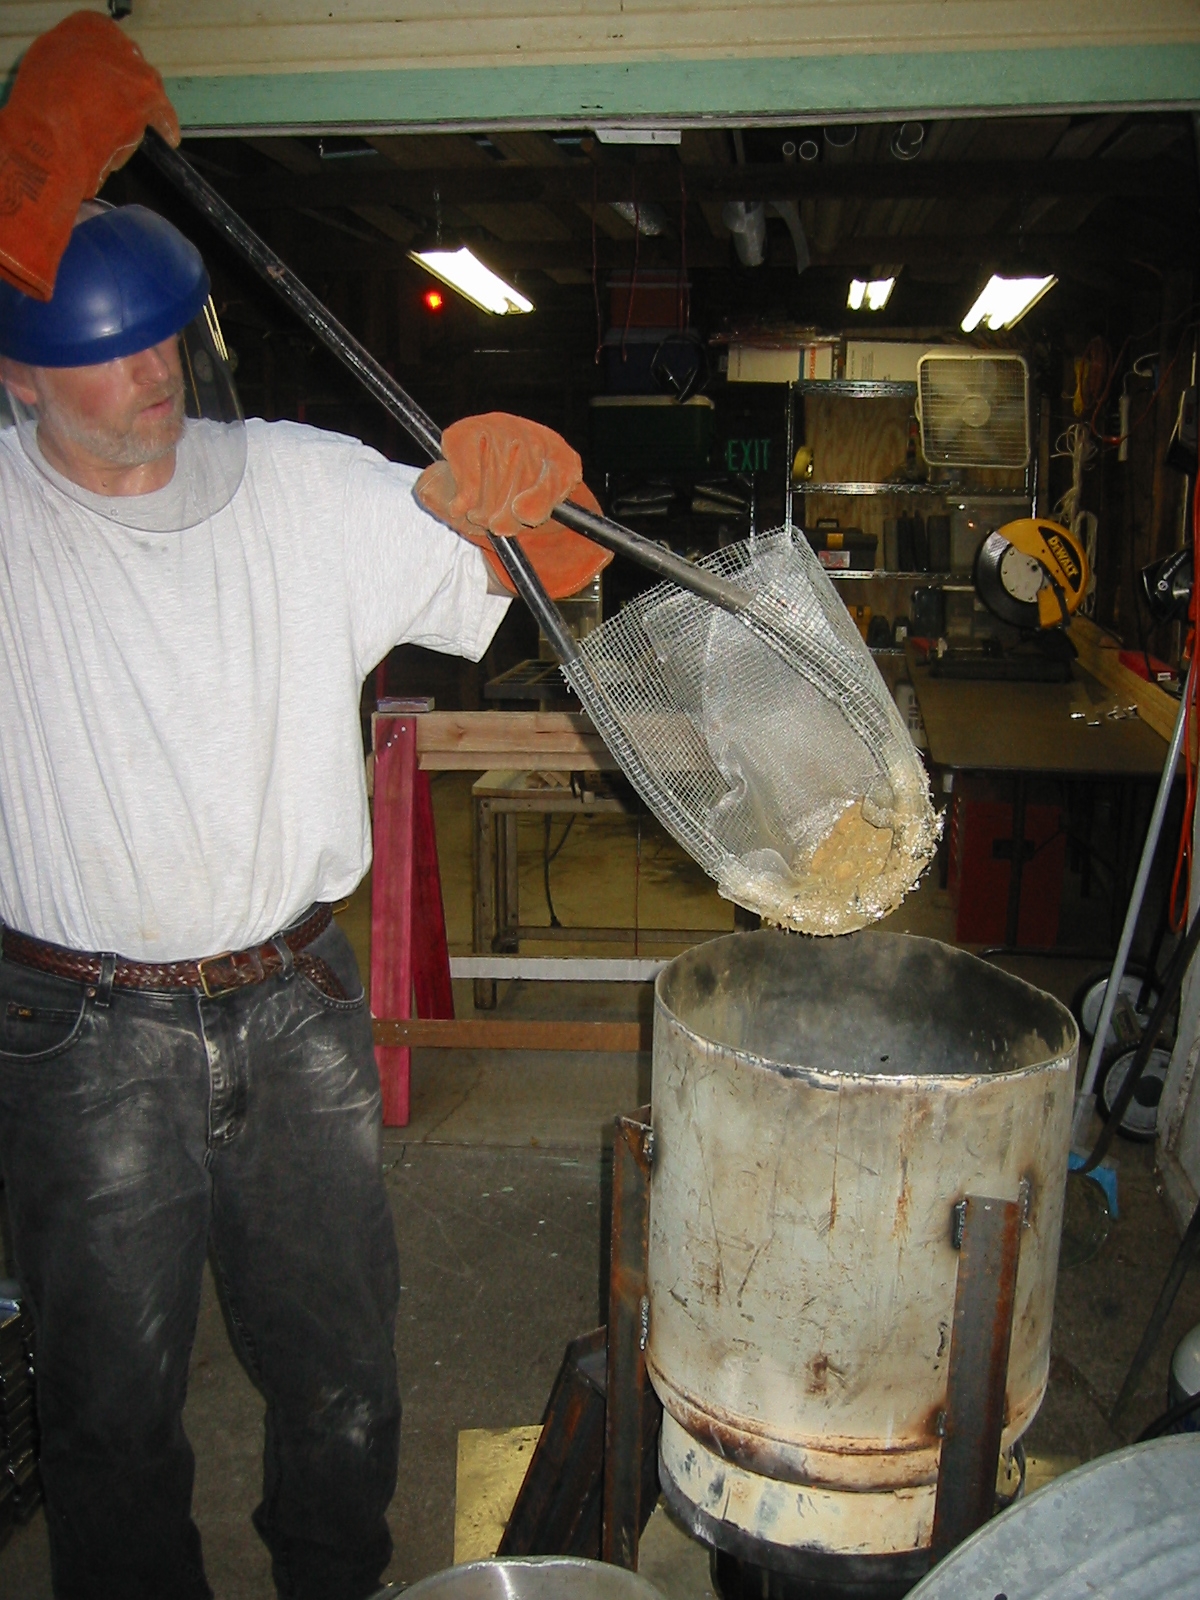
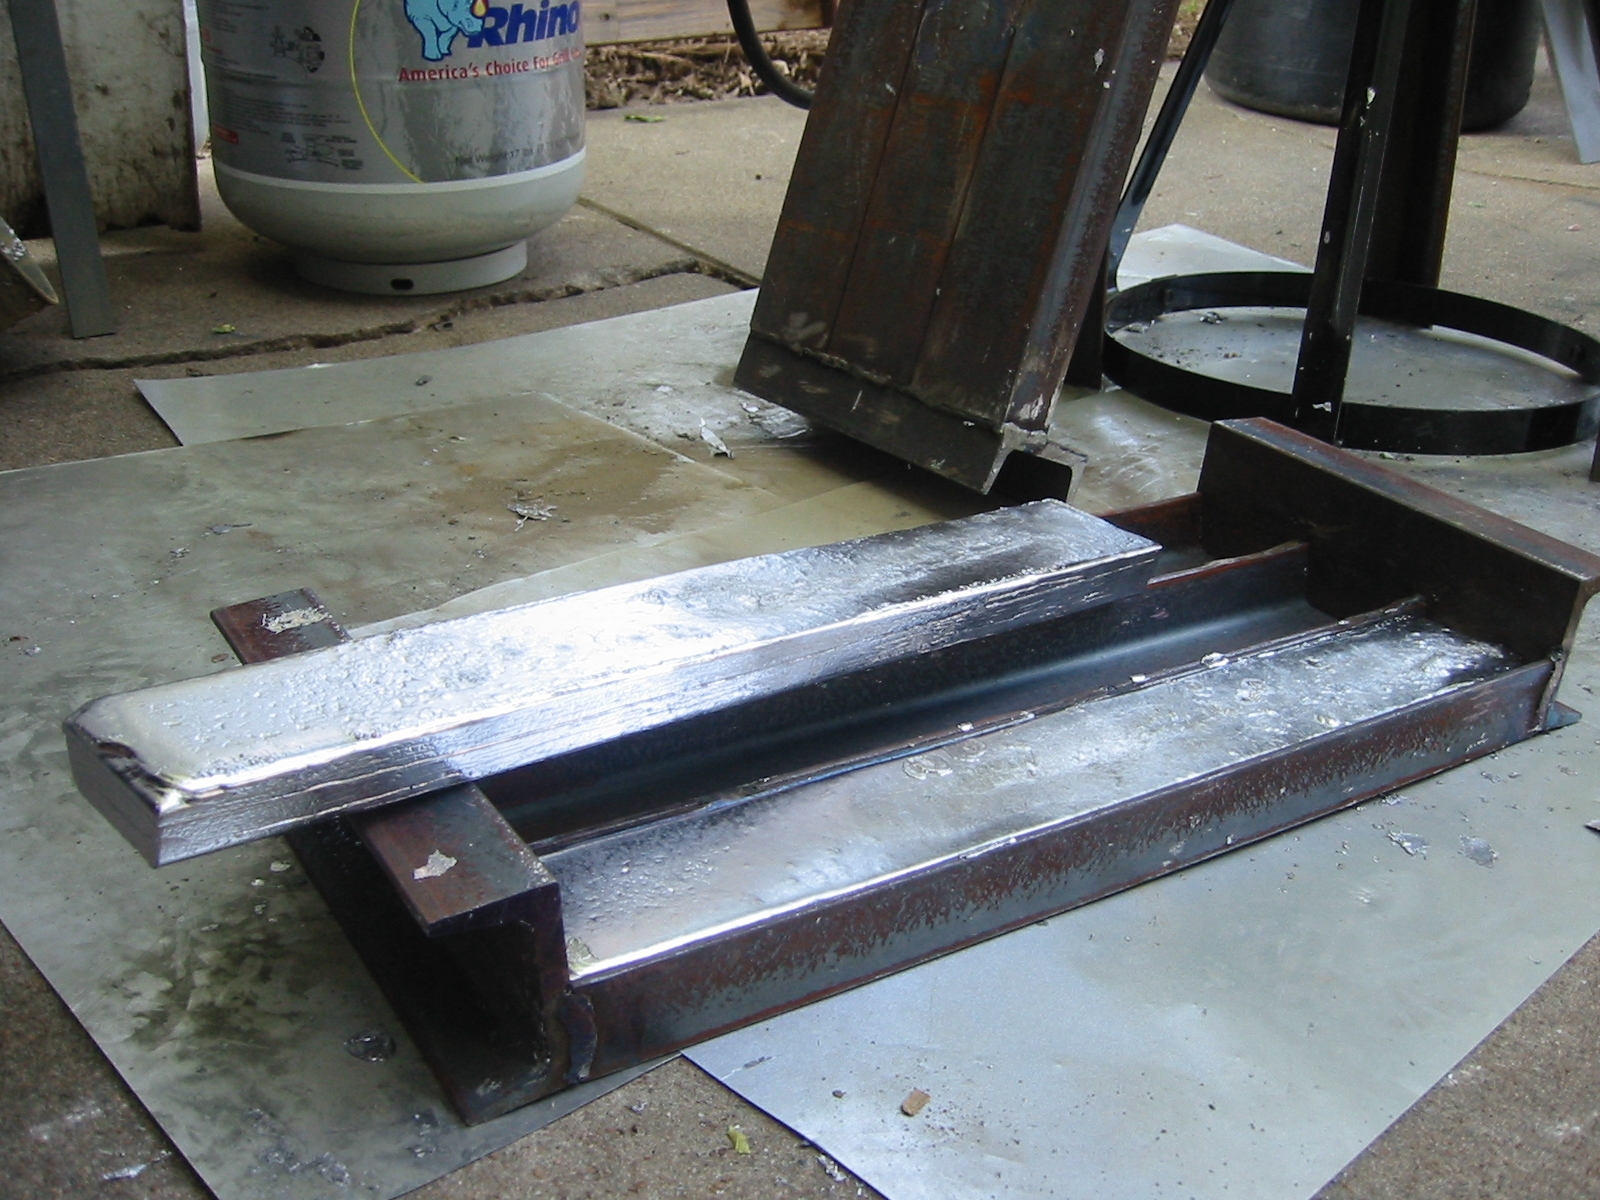
(1) A trip to the scrap metal yard turned up steel compressed air tank about 16 inches in diameter. I had the yard torch off about 18 inches of one end and also cut down the collar. A steel plug when in the outlet and it sits collar fits nicely over the burner. After seeing how hot the burner legs got during the first test batch I went back and got some angle iron and gave the pot its own set of legs. Now I can load the pot up with 200+ pounds and not worry. (2) The tool are a screen on a steel pipe to fish the trash off the top of the molten lead, a steel bucket riveted to a steel handle for scooping out the trash and ladling out the molten lead, and a steel bar to stir and move the trash into the ladle. (3) If your lead has scrap in it like my gun rage bullets, then you will have a lot more work, but here are some tricks. First off, do not wash the lead thinking you can wash off the dirt, as the lead also disintegrates into a fine dust and it will wash away too. I created a small version of Tar Creek in my back yard and ended up scraping off a half inch of soil in order to remove the lead. Second, do not fill your pot so deep that you can't run an steel bar to the bottom. You will have to routinely push the bullets down into the bottom of the pot as they begin to melt. I didn't do this on my fist full load and after running the burner for 6 hours I the lead still had not melted. The problem is that heat does not travel well through the air spaces between the pieces of lead and the trash. Starting with a puddle of lead in the bottom from the previous batch also helps. But do not add scrap after there is melted lead in the pot, unless your are sure it is dry. You can start off with wet scrap because it will have time heat up and dry before there is any melted lead. (4) The best thing I did to speed up the melting process is to put a lid on the pot. My lid is an old metal wash tub. This will trap heat and help start raising the temperature in the lead that is above the molten pool. When using a lid and poking the pile down every 10 minutes or so I can melt 120 pounds of lead in about 2 hours and burn about 2 gallons of propane. If you keep poking the scrap down into the pool of melted lead in the bottom and eventually all of the brass, copper and dirt will be floating on top. (5) 90% of the scrap can be removed with a ladle and a steel bar. My ladle is actually a 2 quart metal bucket that is riveted onto a piece of flat steel bar. If you build one of these then check the rivets for wear and damage. You do not want to drop a bucket of molten lead! Another steel bar is used to rake the scrap into the bucket. (6) You'll have to dump the trash into a metal bucket, so I got to use my bent turkey fryer pot after all. Do not try using anything but metal, as the trash will still be over 600 degrees. (7) Once you work your way down to the lead you can dip up lead along with the trash floating on the surface and cautiously allow the lead to drain back into the pot. (8) The last of the trash, which will mainly be dirt can be removed with a wire mesh strainer like the one found in your kitchen. I actually tried a metal kitchen strainer after I welded on a 2 foot handle, but it only lasted through 2 batches. I made a better strainer from a half inch steel pipe with a loop bent into one end and then I wired couple of layers of 1/4 inch hardware cloth wired onto the loop, and finally a couple of layers of aluminum window screen is stitched to the hardware cloth. Be prepared to replace the window screen a couple of times as it will not last more than a few batches if you let it get too hot. I tried adding beeswax which is often used as a flux, for removing impurities like copper and oxides from lead. I did enjoyed the impressive plume of white smoke that preceded the flames that shot up out of the pot but I didn't notice any benefit when it came to the end product. Fluxing sounds important if you are casting figurines or bullets, but it is not important when we are talking about ballast. (9) My molds are made from 3 inch channel. I have two molds, each with 3, 19 inch lengths of channel welded side by side with ends made from more channel. The steel is over 1/4 inch and they heat up nicely when leaned up against the burner while the lead is melting. You should have two sets of molds, so that one can be cooling while you are pouring the second. (10) It will only take 8 to 10 minutes for the lead to set and then you can dump out the first mold and start over. Each ingot from my molds weights 19 to 20 pounds. If you want to make life easier on yourself then get lead with little or no trash in it. I picked up a 240 pounds from the scrap yard that was chopped up pieces of lead pipe for 25 cents a pound. I figured this was a pretty good price considering that my bullets from the gun range were half trash material making the actual cost for the extracted lead about 16 cents a pound. After I add in my drive time, trailer rental, fuel and not having to remove hundreds of pounds of trash, the extra 9 cents didn't seem too bad. The trash from the gun range material with the dirt and rocks included has no salvage value, but the scrap yard did take it off my hands without change which is something for the sanitation workers to be grateful about. However I found that my 240 pounds of lead pipe has its own problems. (11) Lead used to make pipe especially the old lead pipe found in scrap yards as well as the lead that comes from chemical plants and radiation shielding used to line the walls of X-ray rooms contains from 1 to 12% antimony. Antimony is added to make the lead harder and better suited for construction. If your building an fin keel for a sail boat then you'll need between 3 and 5% antimony, but for internal ballast it is not needed. Antimony weighs about the same as iron so it is actually lighter than lead but not by much. It is number 51 on the periodic table and has an atomic weight of 121.76 compared to lead at number 83 with an atomic weight of 207.2. The real problem is that it melts at 630C or 1166F compared to lead that melts at 327C or 621F. My pot would get it to melt, but it would float to the top where it cooled and hardened into the ultimate bath tube ring. It also cools quickly and clogs up the screen strainer as well as hardens around the edges of the ladle. The end result is that my 240 pounds of lead pipe yielded only 180 pounds of ingots. The rest was 20 years of grease and corrosion that came trapped inside the pipes and antimony that was thrown out with the trash. My final cost for extracted lead from the lead pipes was 33 cents a pound, convincing me that the gun range lead at 16 cents a pound was worth the drive to Arkansas and we could always do a little diving in Beaver Lake on the way.
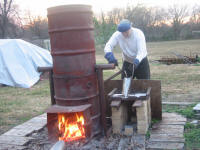
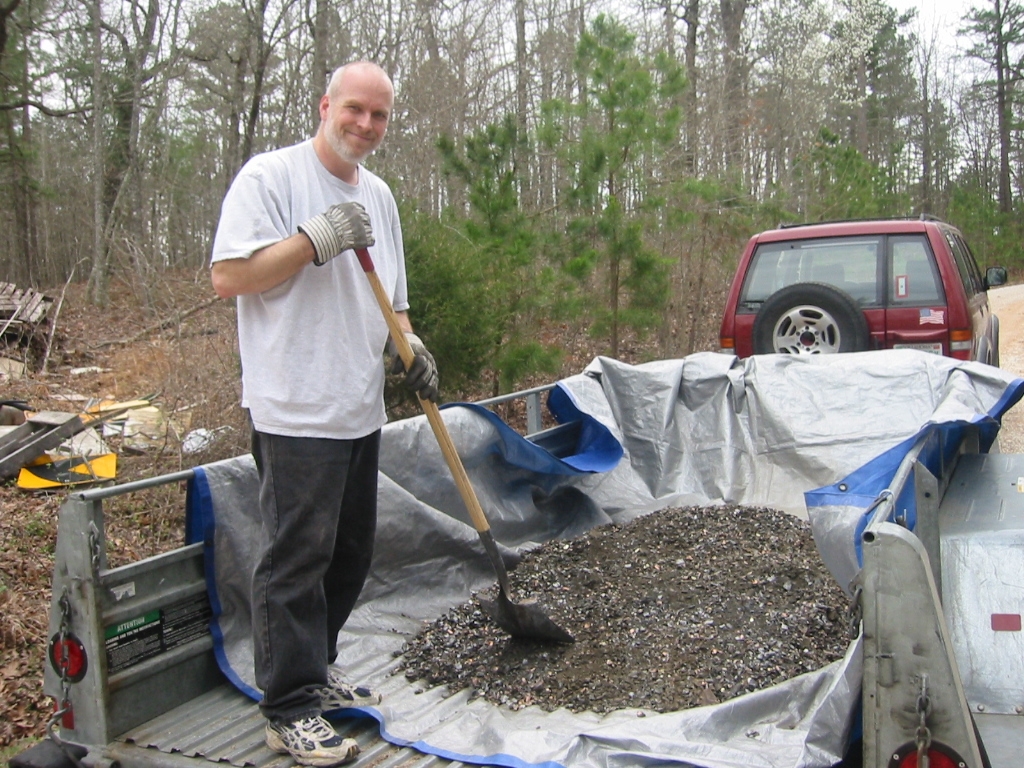
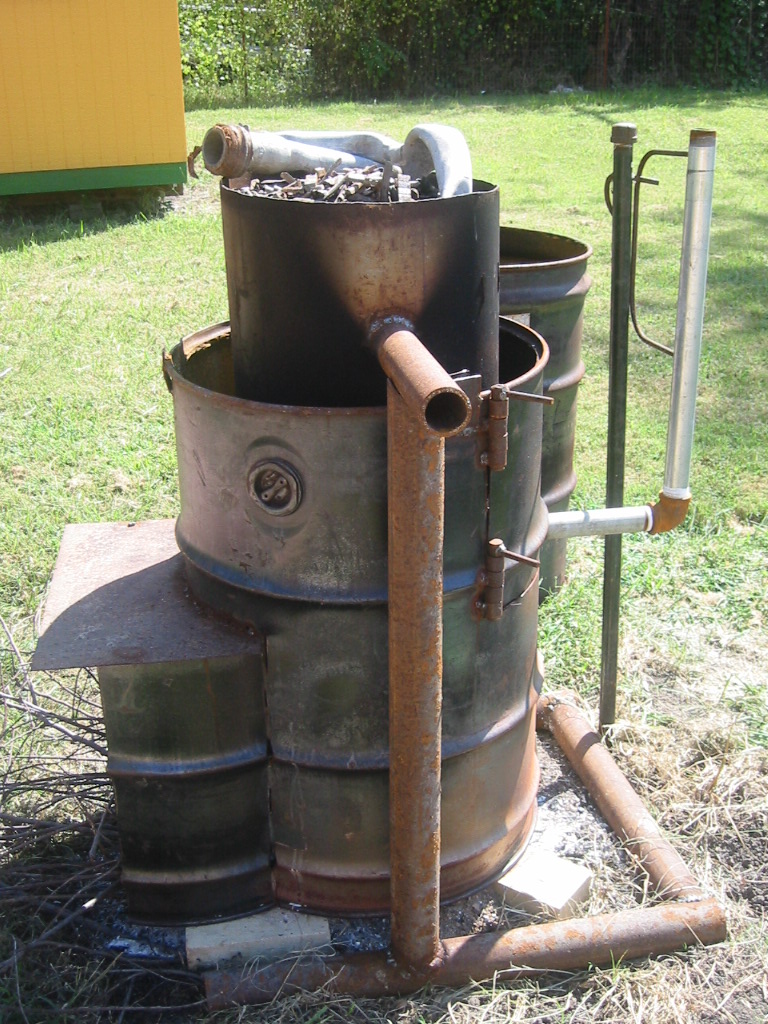
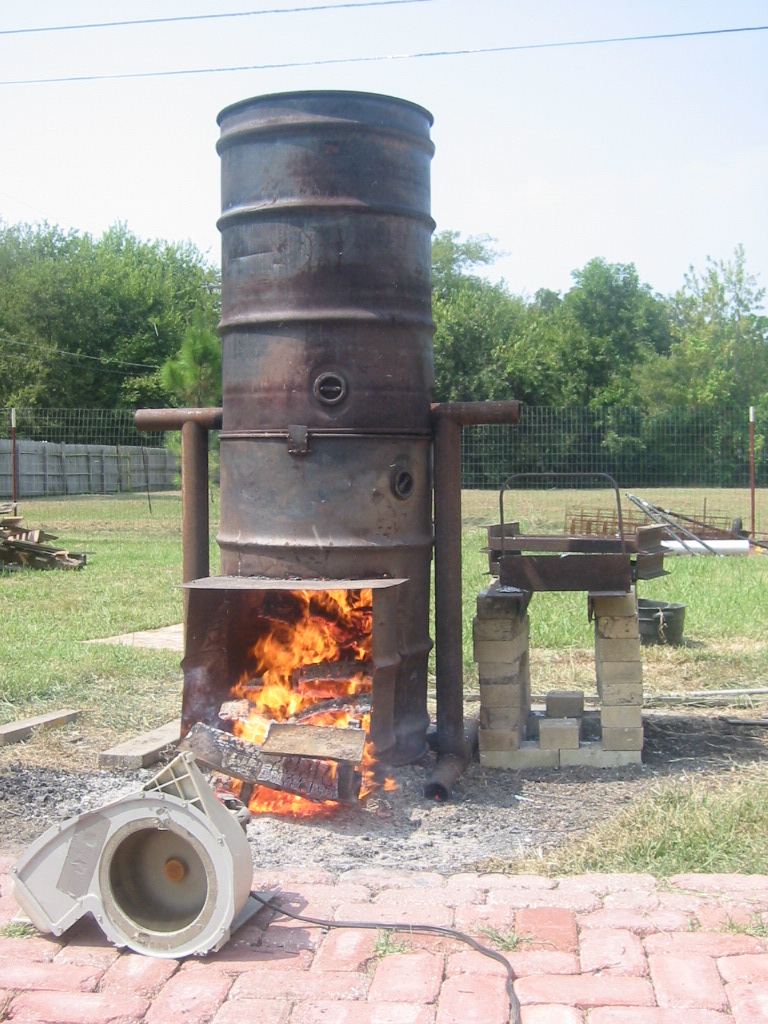
Wood Burning Lead SmelterWe already have the lead we need for the submarine, but we are starting on a sailboat once the sub is completed so we are back in the lead collecting business. We need 30,000 pounds this time so an upgrade to the smelter was in order. Our source of bullets dried up so we have cultivated a list of tire stores that sell us their used wheel weights. About 20% of what we collect is scrap in the form of the steel clips, and assorted lug nuts, studs, and valve stems. We picked up 1000+ pounds from 10 stores in 4 hours on one
Saturday a month. It will take another four hours to melt them down
into ingots. With the steel clips gone we will end up with 800
pounds of lead. And cost to us is about 27 cents a pound. Clean lead
at the local scrap yard is 80 cents a pound. We currently have 17000
pounds so we have saved just over $9000 dollars which comes out to
about $40 per hour. And we like the Saturday drive together.
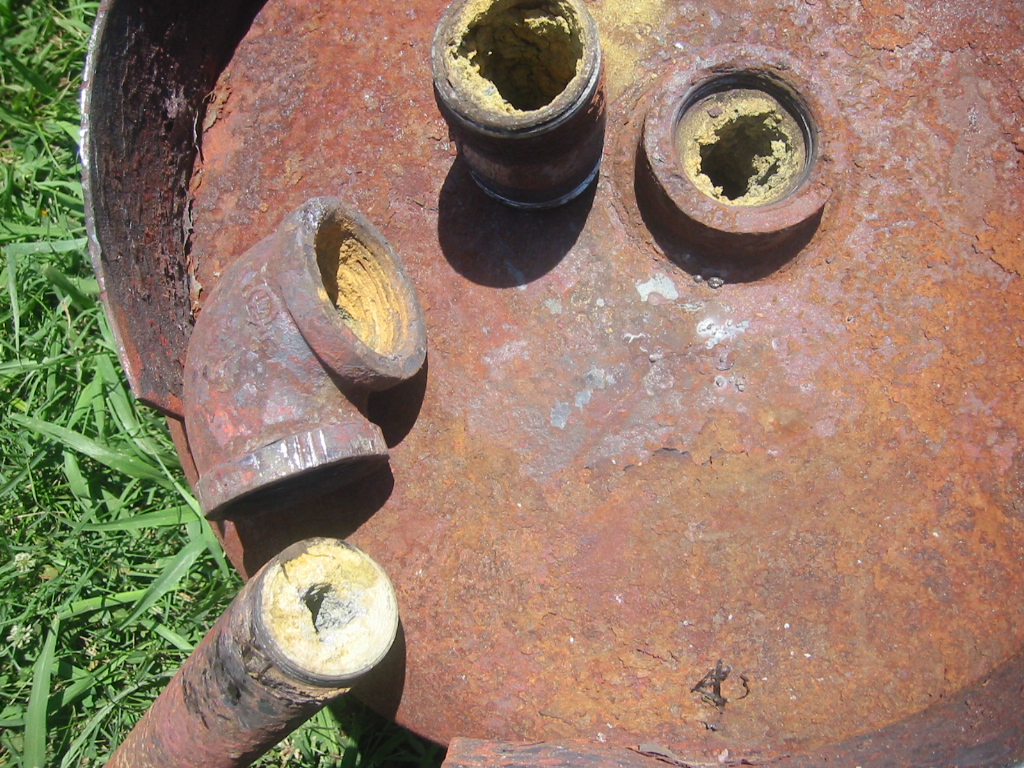
(1) The new smelter is a delight to work compared to the old one. It uses the same melting pot, but the pot now has a steel pipe fitted to the bottom. A 90 degree elbow directs the pipe out to the side and then another 90 degree elbow that is not completely tight allows for second pipe stand upright while the batch is melting and then it can be rotated down to pour the lead. A piece of angle iron with a handle is used to direct the molten lead from the pipe into the molds. The melting pot also was fitted with a stand that allows it to be pitched, so that once the scrap left behind has cooled it can easily be dumped into the trash. The melting pot is then surrounded by two 55 gal steel barrels, one stacked on top of the other. The lower drum has an opening for feeding the wood fire below and a hinged hatch in the back that allows it to be pulled away without removing the melting pot, so that the trash in the melting pot can be dumped. (2) To get the temperature way up; a blower from a old dryer forces air through a 6 inch metal pipe into the fire box and the second barrel acts as a chimney and draw the flames up the sides of the melting pot. The pot can be loaded to the top and in about 60 minutes the blower can be turned off the top barrel removed and more weights can be added. Repeating this process twice allows for over 600 pounds usable lead to be processed in less that 4 hours. (3) Once the fire is going good I found that I can cover the top barrel with a steel lid to act as a damper. This traps the heat and cuts down on the amount of wood needed. (4) A propane torch is used to heat the pouring pipe when the batch is ready. Then it is just a matter of pulling the pour pipe to the side and directing the lead into the molds with a piece of angle iron. The 1/4" round bar handles welded onto the pour pipe and the angle iron keep the heat and lead away from my hands. (5) After over 40 uses the pour pipe completely choked off with lead oxide. It was possible to scrap it out but a lot of work, so I just replaced the lower pipe and fittings in order to save time.
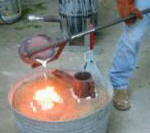
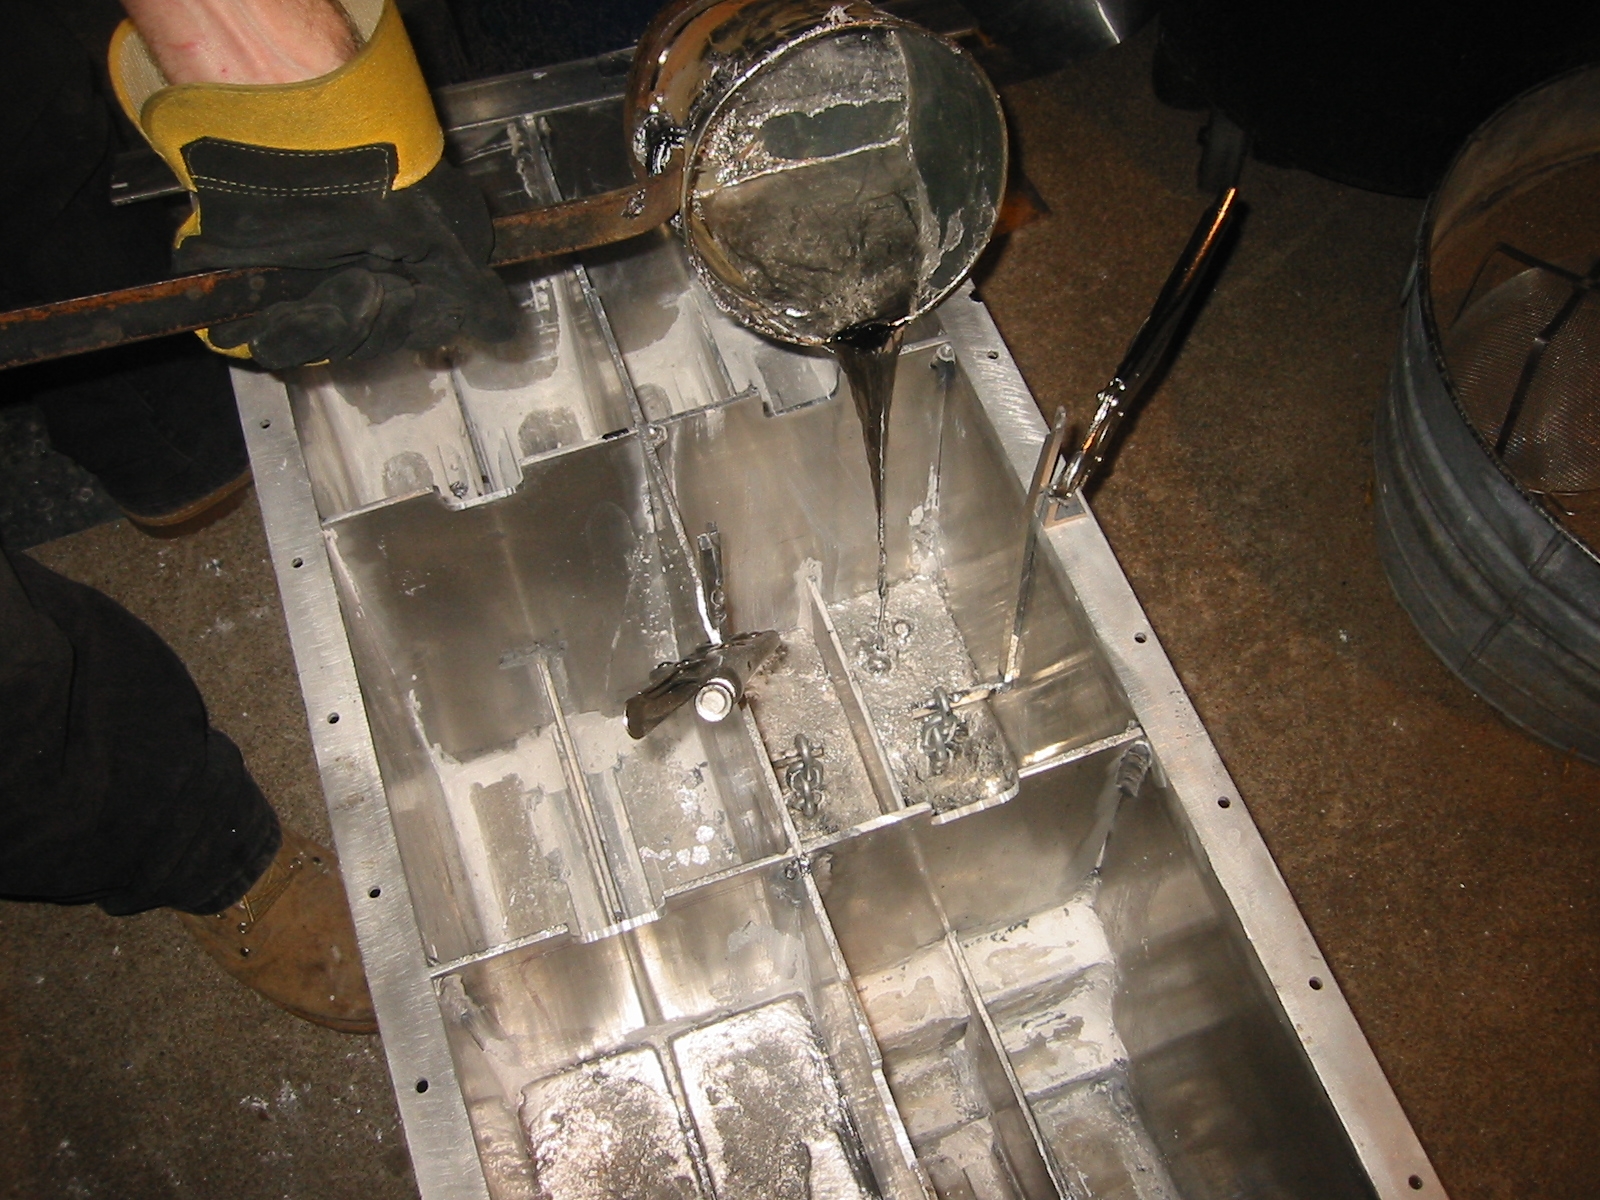
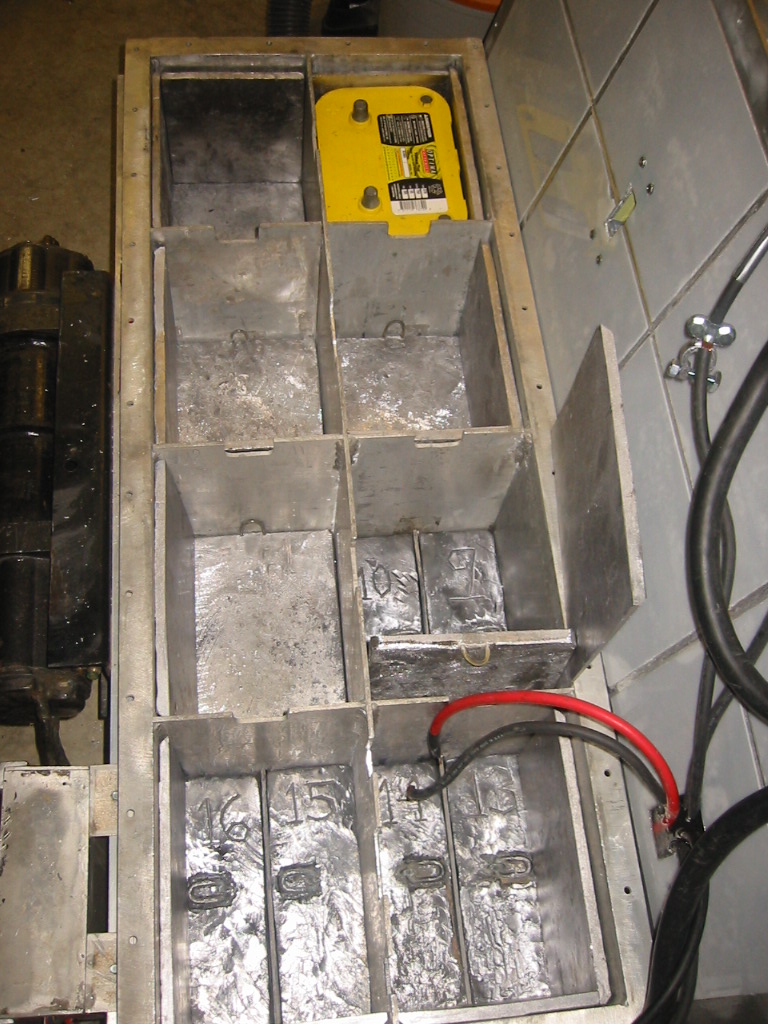
Pouring the Ballast SledThis lead was finally being poured into it's final resting place which is the submarine's ballast sled. (1) Melting down lead ingots is sure a lot more enjoyable the melting down the raw bullets. Just drop the ingots in, skim off a little dross and dip out the molten lead. Do be careful adding cold ingots to hot melt. If the ingots were poured slowly, allowing then to cool in layers, then they will have small gaps between the layers were rain water can collect. A couple of the ingots popped shortly after added then into the hot melt. They should have been heated slowly rather than dropped directly into molten lead.
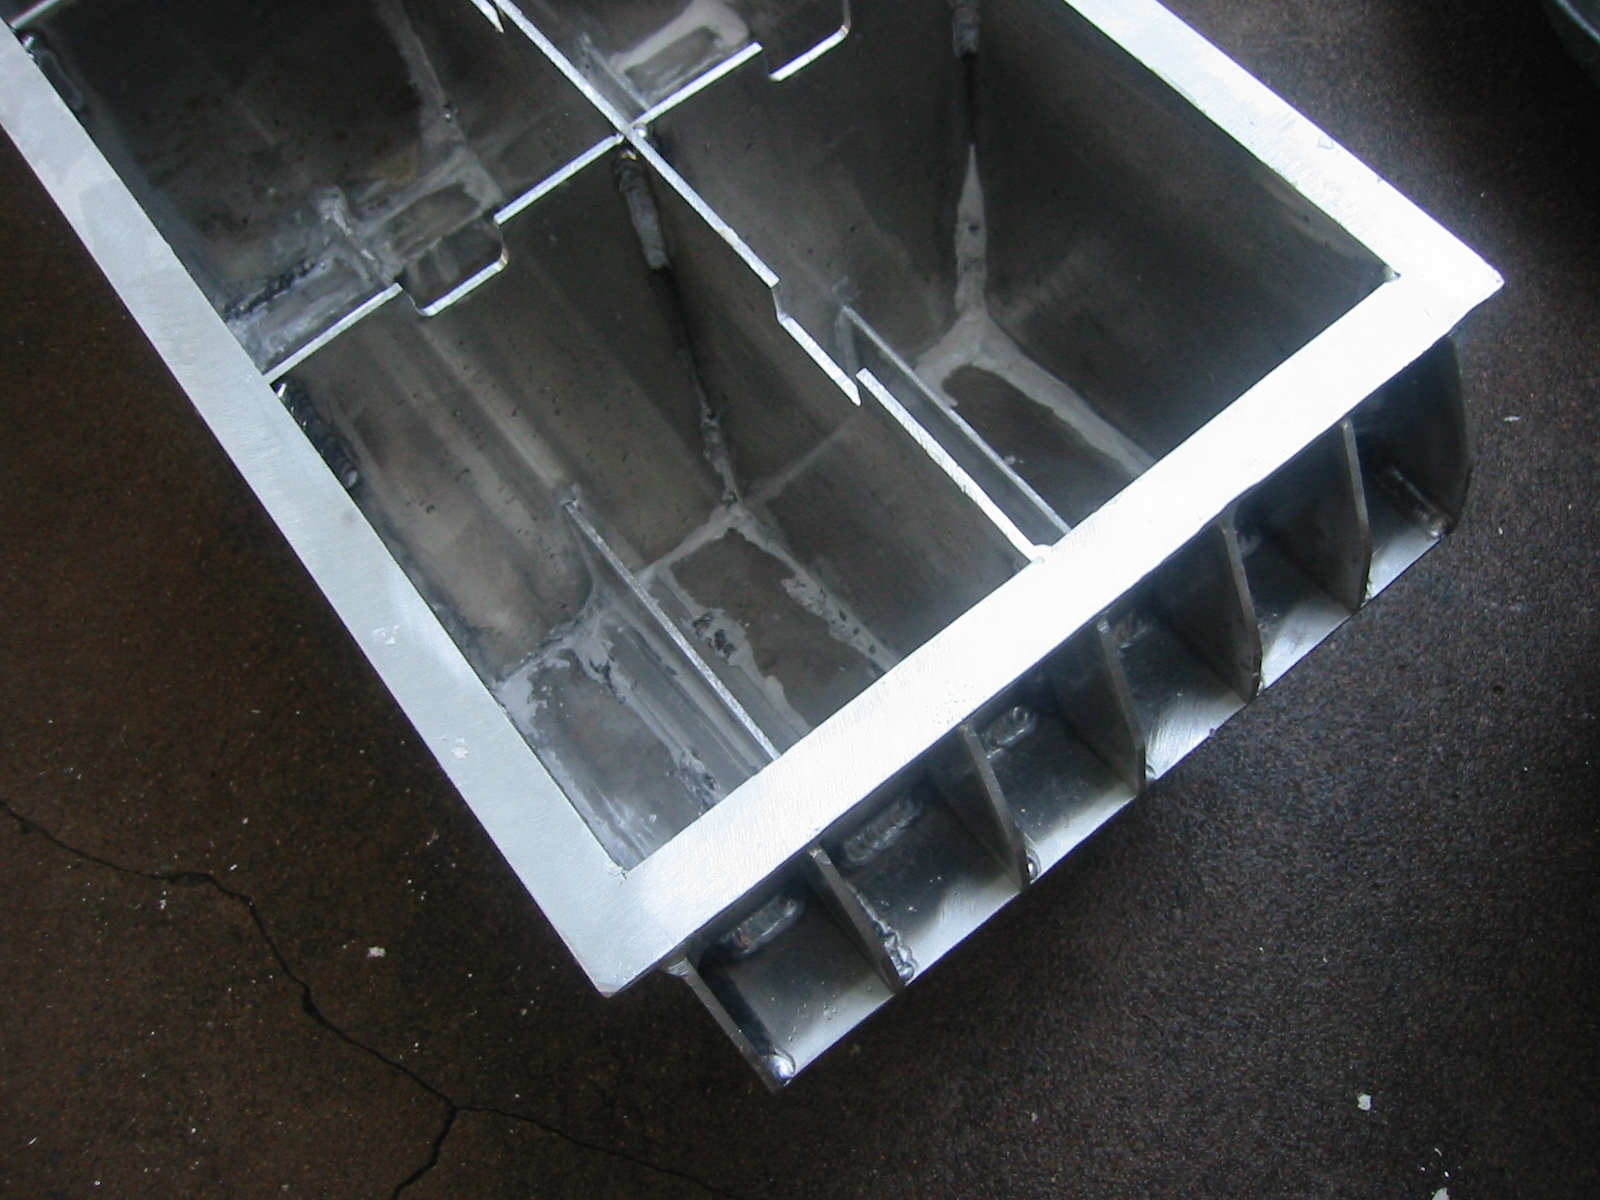
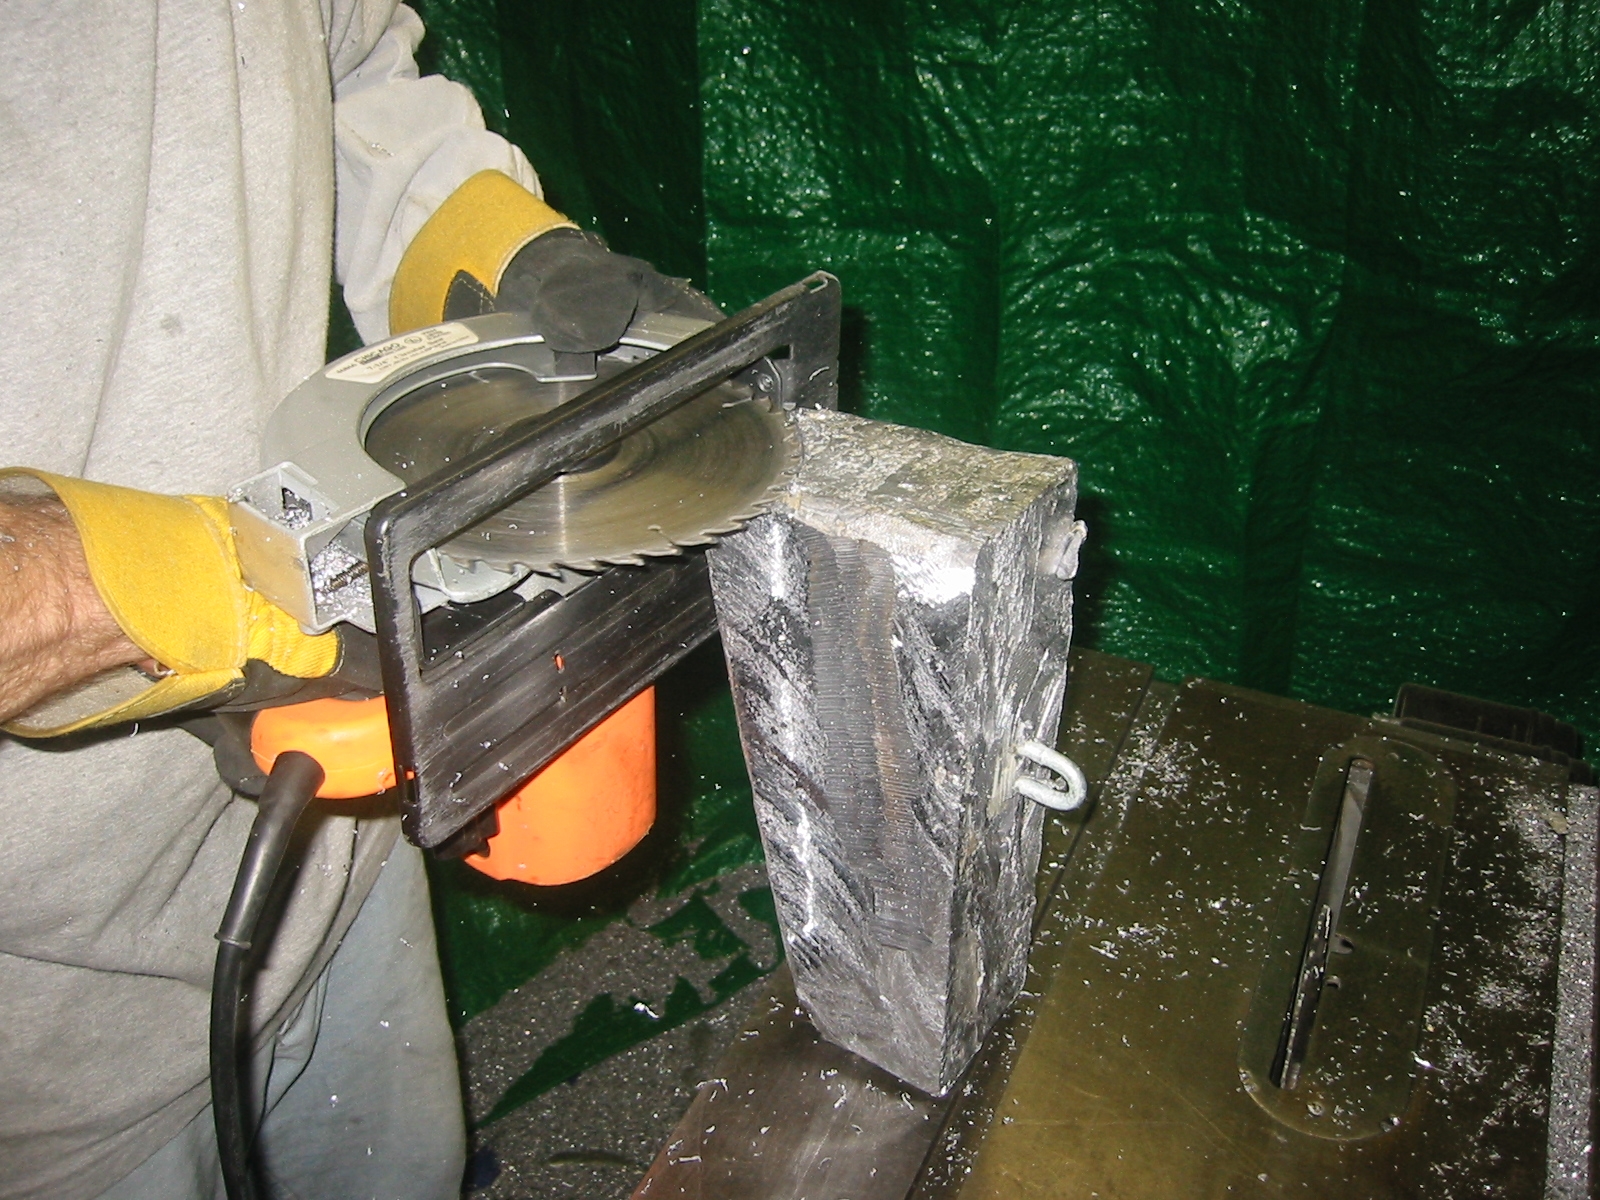
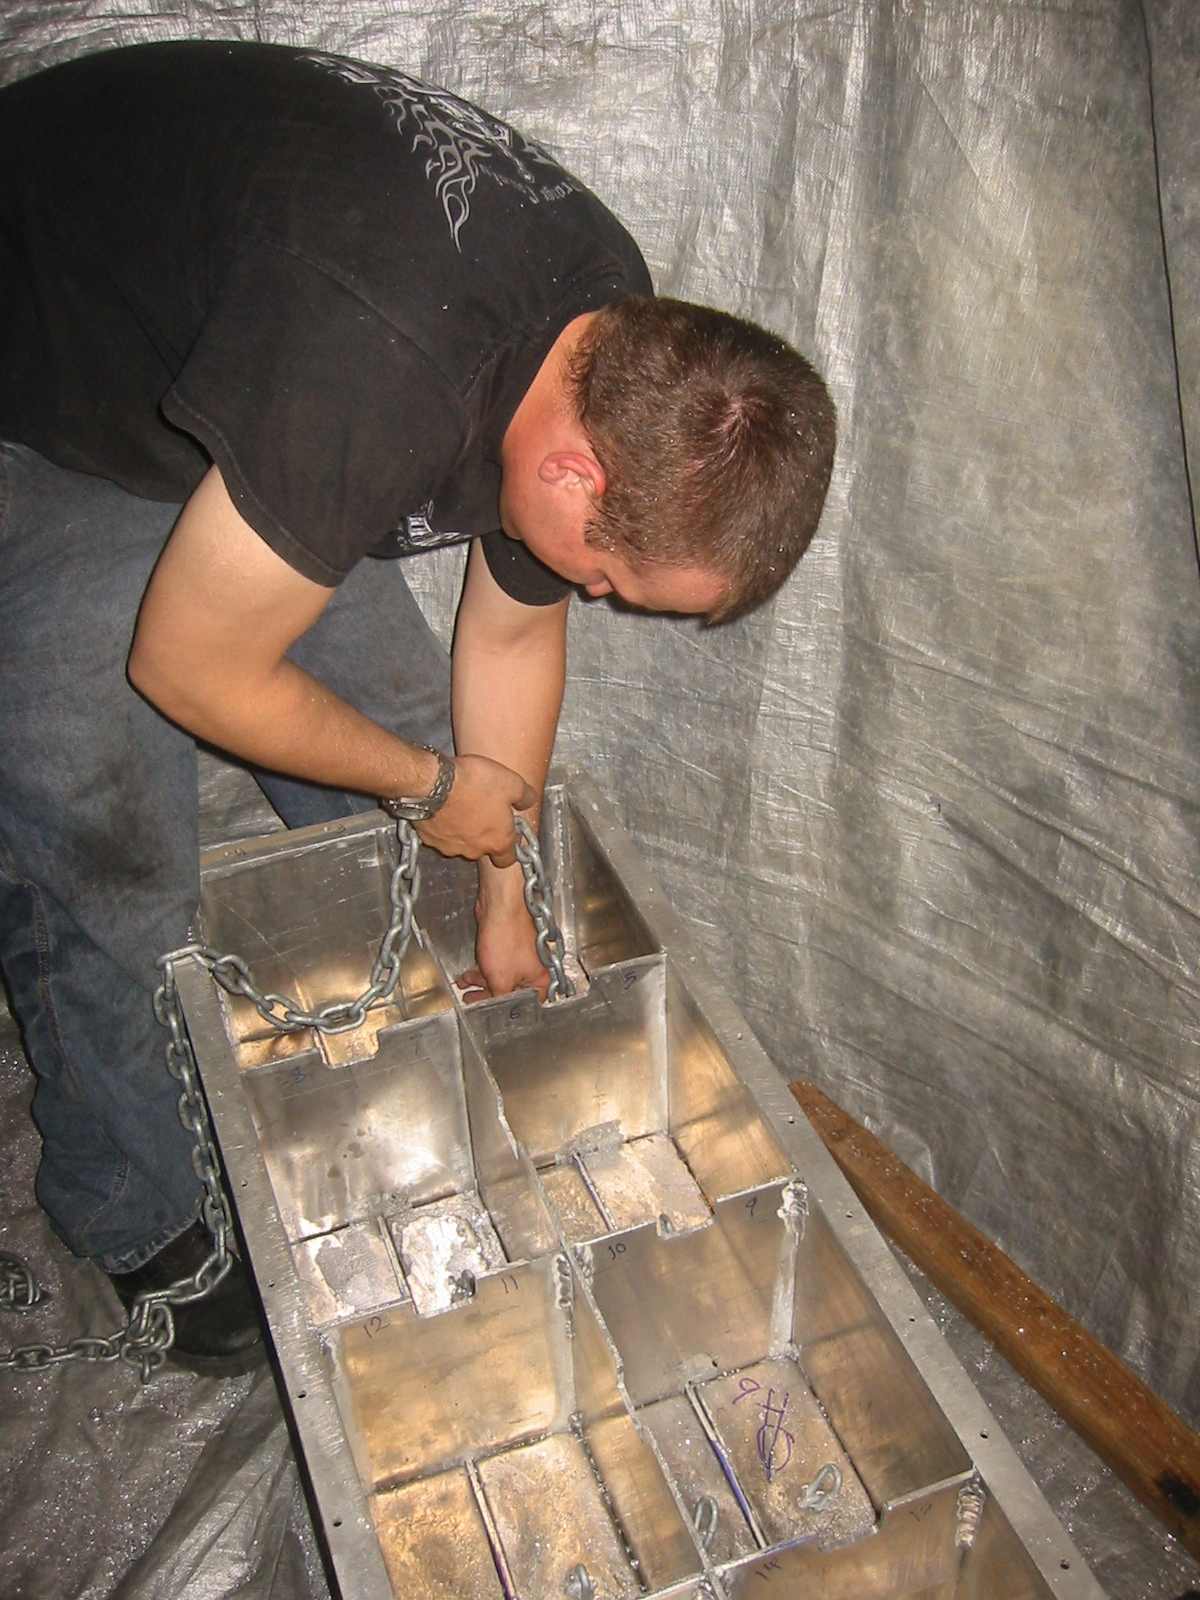
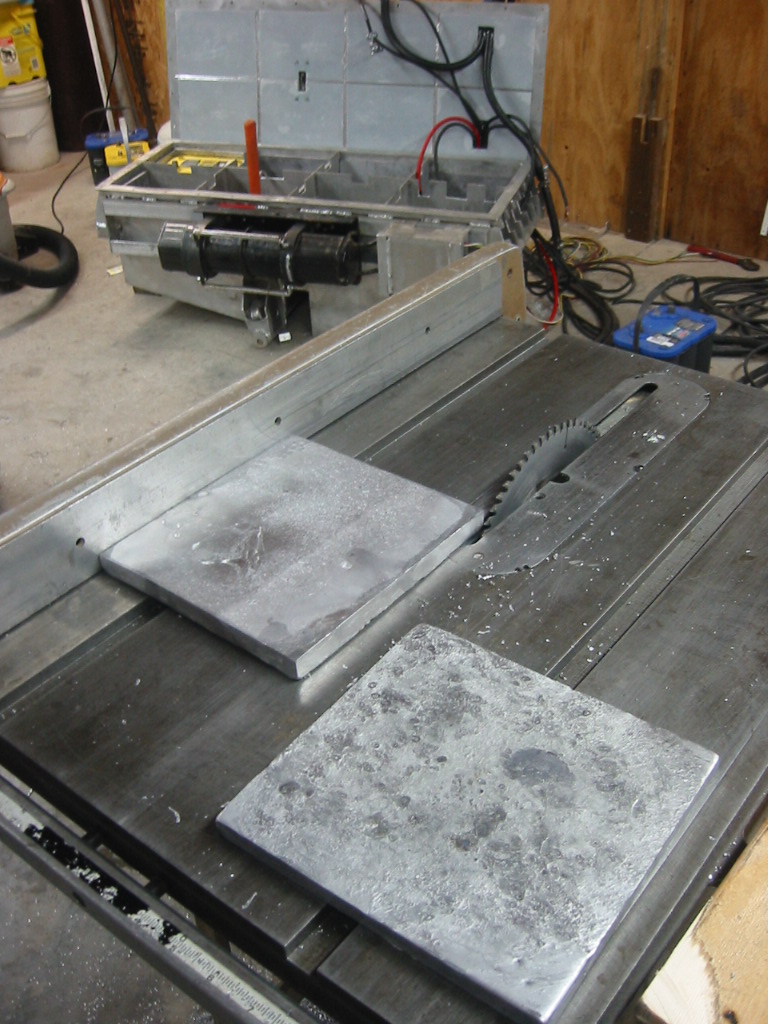
The lead blocks will need to be lifted out of the compartments in the sled otherwise it would be impossible for me to move it without a small crane. (2) Before the pour we added fillets of plaster into the corners and edges of each compartment in order to round them off , cover the welds, and fill the cracks between the compartments. Be sure to allow a time for the plaster to completely dry. (3) Before pouring each compartment, short sections of 5/8 inch chain were suspended into the opening so that they will be cast into the lead and become lifting points. Pouring slowly is necessary so that the lead cools and stiffens around the bottom link of chain, otherwise the steel chain will float in the molten lead. Its the strangest thing to see. The aluminum made a great mold and the lead did not stick to the aluminum, but I made a mistake thinking that the lead would contract enough to allow me to easily remove it. Instead it required a 5 foot 2x4 to pry each block out. We connected a chain from the block to one end of the 2x4 and used wood blocking as a fulcrum. And once out of the hole there was no going back in until the block was trimmed down. In hind site I should have added 1/6 inch sheet metal shims to the inside walls of the compartments in order to form a smaller block. (4) Cutting lead with a skill saw is something I do not recommend, but it works! We first hung tarps from the ceiling in order to prevent the chips of lead from flying all over the shop and back yard, and fly they will. You do not want to be standing in front of the blade! Eye protection, and gloves are a must, I am also wearing a leather sleeve on my left arm. Lead chips and electric motors make a bad combination, so use a cheap saw. Where the blade can not reach across the block you can drag it sideways across the surface and remove a thin layer as you go. Your High School shop teacher would freak if he saw you doing this and rightly so. Be sure you can count to 10 without using your fingers before you try it. (5) After an evening of trimming, trying and trimming a bit more, Carl and I had all of the blocks rough cut to fit into there compartments. Sure glad he was around to lift and move 1200 pounds of lead several times. No need for a trip to the gym tonight.
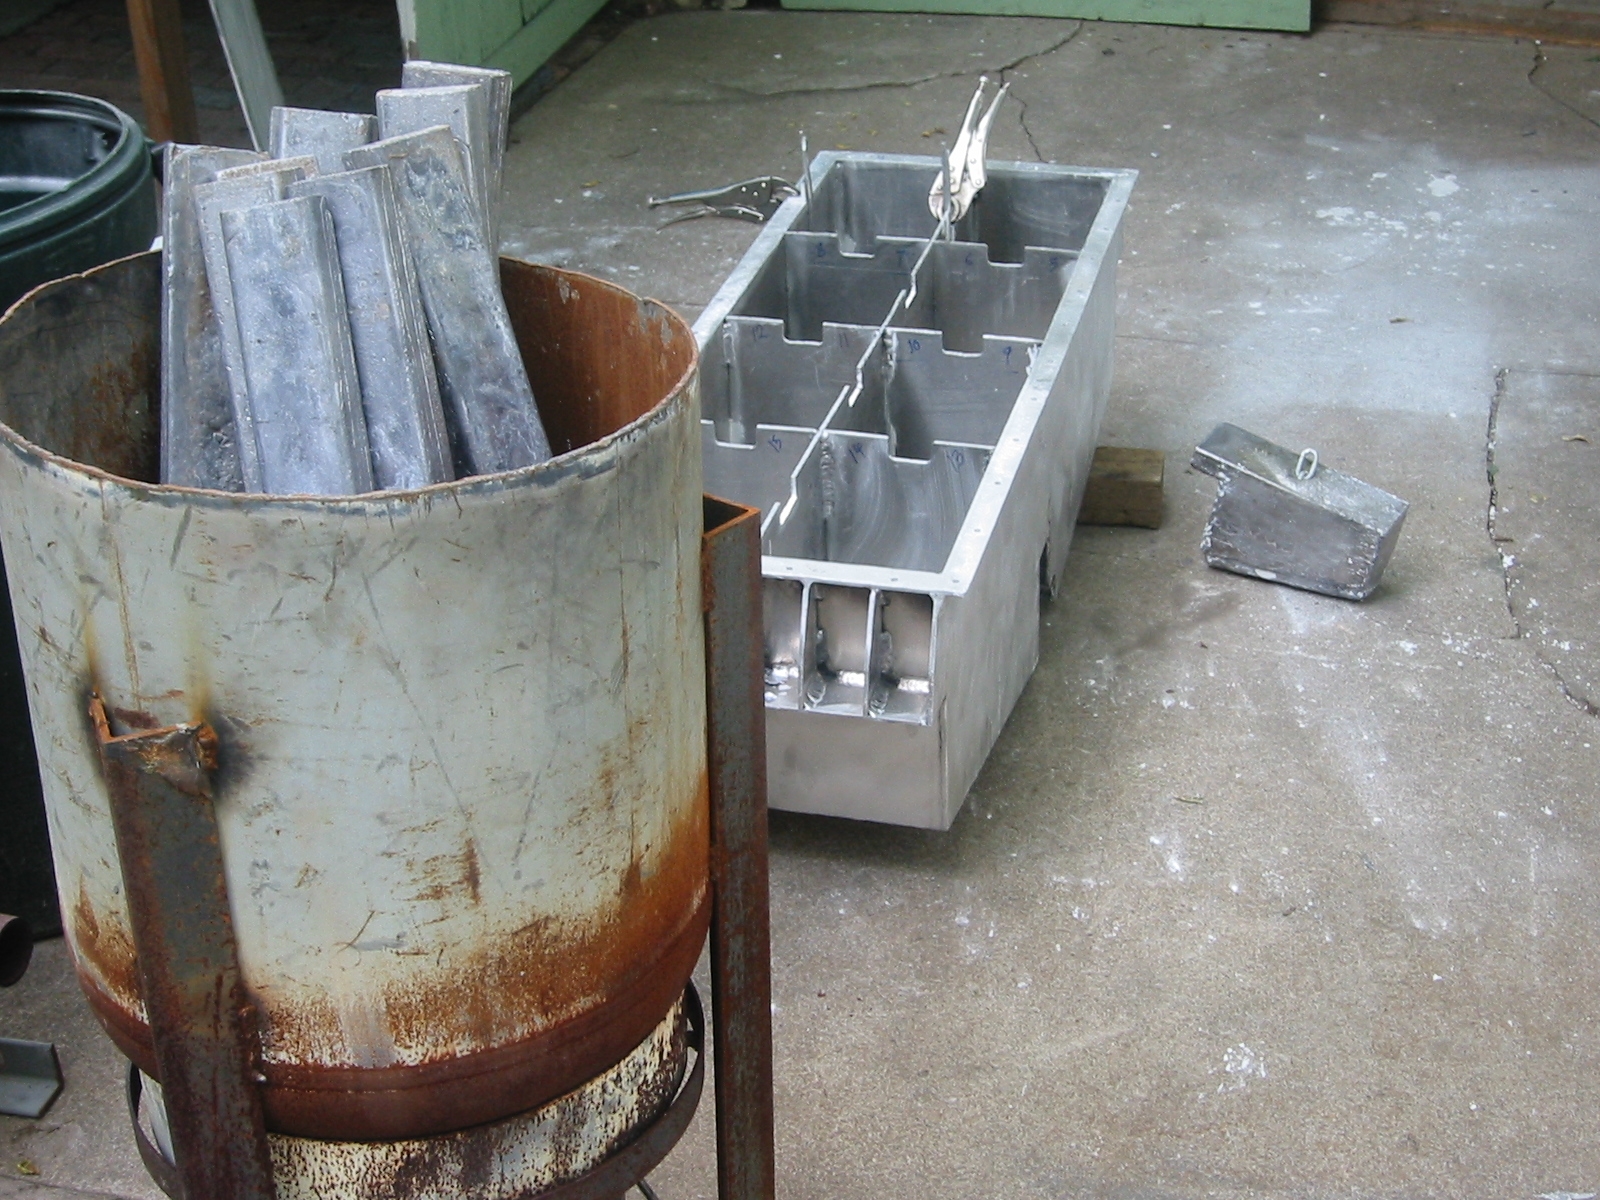
Making Lead PlatesFlash forward! Its now December 27, 2007. We are in a new house and shop, Carl is missing a kidney due to and IED in Iraq, he and Randi are married, and Kay and I are going to be grand parents in April. Wow! This week the submarine's ballast sled gained about 300 pounds from lead plates that were added to fill the gaps under and around the batteries.
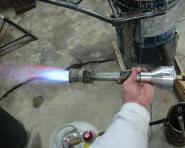
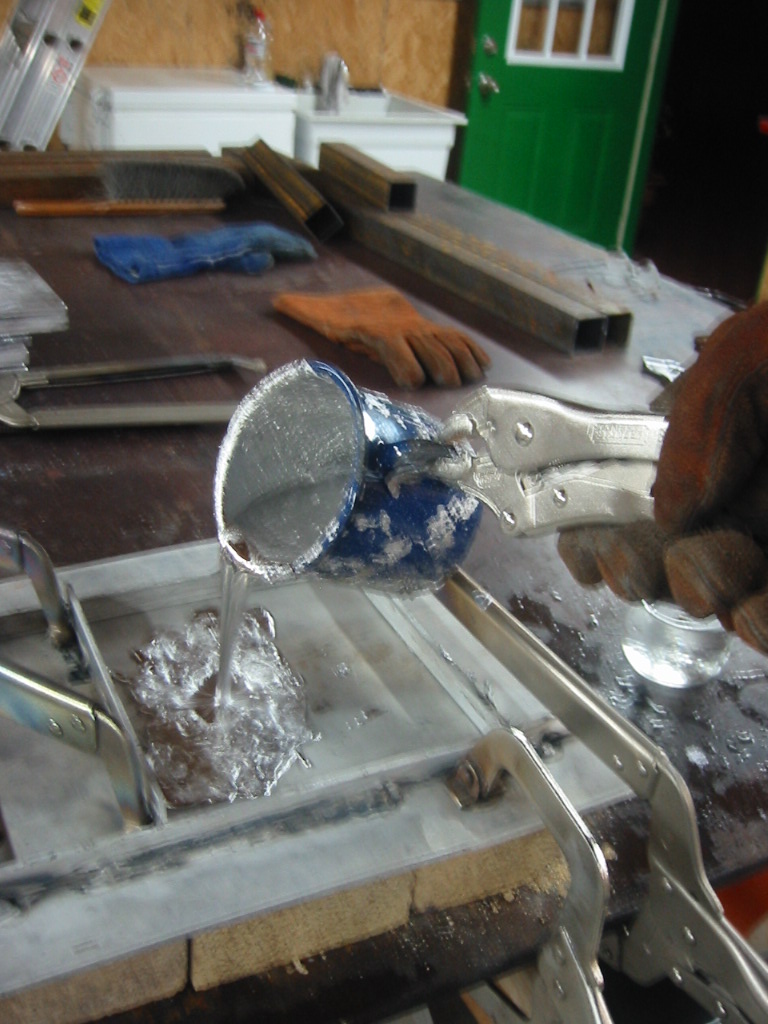
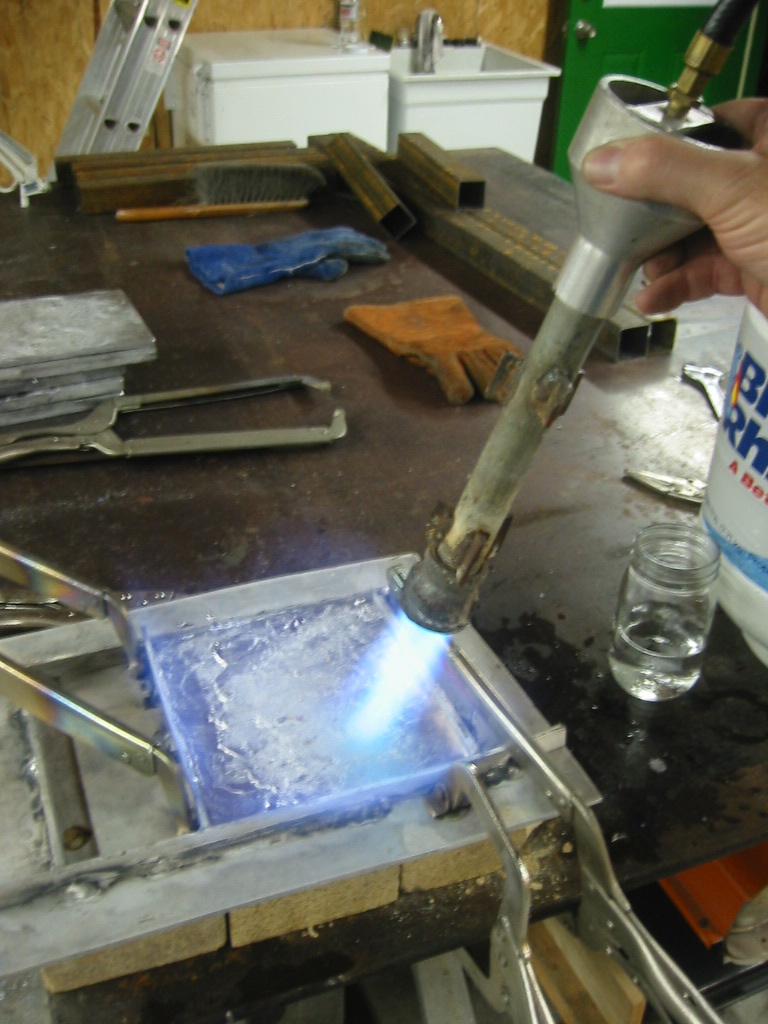
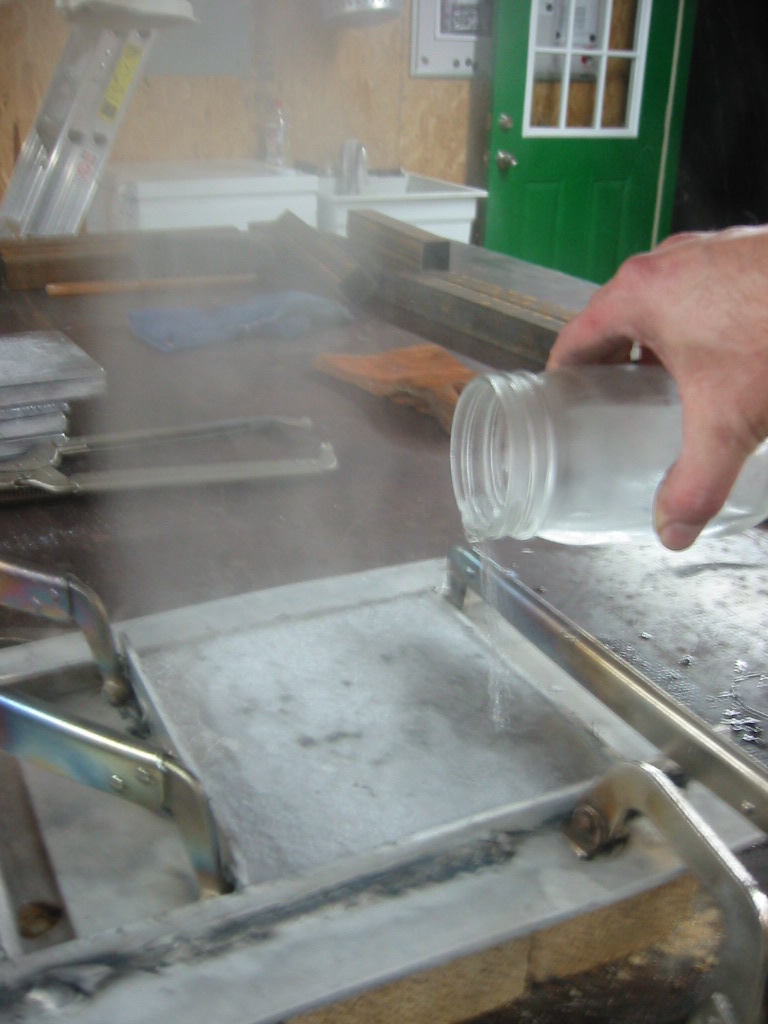
Making the plates was fairly painless but also time consuming. If you are starting here on this page you might consider going back to the top and reading some of the bad things and cautions about working with lead. (1) I first built a quick mold from some 3/16" aluminum. In the photo to the left the mold has a partition added to form up the smaller plates. The side are 1/2 inch and thinner plates are simply poured shorter. The mold is setting on top of fire brick and clamped down to the work table. (2) My foundry I use for melting aluminum makes quick work of melting lead. I have also made a modification to the propane supply. If you look close you will see that the regulator is gone and I also drilled out the orifice to something that would be more appropriate for natural gas. These modifications make controlling the flame more difficult, but they also gave me a lot more heat. (3) When the lead is poured into the mold, it cool and sets very quickly so getting a level surface is impossible. Sorry about the blurry photo. It's not easy to pour 600 degree lead and take a photo at the same time. (4) Once the lead is in the mold the torch is used to melt the lead again and smooth the surface. This side will never be pretty unless you were to polish it but it will level the bumps out. (5) If you are impatient you can just wait until the surface has solidified and then pour water on the plate to cool it down. Be careful that the surface really is solid. You do not want to get water under the surface and into the molten lead. On that point; pouring molten lead onto a wet surface will get a steam explosion that propels molten lead toward your face so be sure to heat the mold to remove any water before the next pour. The plates that go in beneath the batteries have loops of wire imbedded in them to make it easy to lift them out. (6) The edges can be trimmed with a box knife if you only want to remove a sharp edge. A rough file can be used to remove more material if necessary, but the best tool for cutting lead is a carbide blade. Just remember that you are creating a serious hazardous waste site when you do this and you will want to get is all done an once and then give your shop a serious cleaning. That includes your cloths. And defiantly no children, expecting, or potential mothers are allowed. You on the other hand may have some brain cells that can be safely exterminated.
Other Lead WorkAnchors for the Argonaut Jr., a wooden submarine.
Argonaut Jr's ballast weights.
|
|||||||||||||||||||||||||||||||||||||||||||||||||||